Showing posts sorted by date for query arduino. Sort by relevance Show all posts

Thursday, May 3, 2018

What is Arduino Create?

It is a web based platform which you can use to connect, create, and colloborate to work with Arduino and related products.

This online platform (you will need to create username/password) enables Makers and Professional Developers to:

Write code
Access content
Configure boards(hardware)
Share Projects

Before Arduino Create, all these activities were fragmented and distributed over various tools, screens, etc.

Read all posts on Arduino on this site: http://hodentekhelp.blogspot.com/search?q=arduino

 Simply put the developer experience is now highly organized using just one tool-Arduino Create.

The next image explains it all.


Main Features:
Always up-to-date online iDE
Offers in-depth guided flows
Configure easily Web Editor and Cloud
Provides Arduino's Educational Program

Tuesday, May 31, 2016

Can you program Arduino 101 with Visual Studio 2015?

The short answer is, Yes you can.

If you rather not use Visual Studio 2015, you could also use the program from Arduino.

But Visual studio does lot more than Arduino Program.

Here is the how and the long answer regarding Arduino with Visual studio..

First thing you need to have is the correct version (if you follow my advice) of Visual Studio. Get the Visual Studio 2015 Community (What I have is the same but with Update 2).

If you do not have, no problem. Read this post.


For Arduino to work with Visual Studio 2015 Community (VS2015C), you need to install the Arduino Extensions for Visual Studio. A default install of VS2015C does not have the 'hooks' to create a Arduino Project. You will not find it in the 'New Project...' templates.

You need to install the Arduino Extension for Visual Studio 2015. You can get an idea how to do it by following this Swaytorial:

Of course you need to buy the Arduino 101. It is available from many sources. Connect it to computer with a USB cable as shown.


With all of the above in place, it is very easy to run the board from Visual Studio 2015 Community.

 Open Tools menu as shown to access the Extensions and Updates... submenu.

arduino101_Vs15C

The extension immediately brings in the support for Arduino 101.


Start a new project as shown here:

arduino101_Vs15C_000

Provide a name for the project (herein OneZeroOne)and click OK. The project with folders will be created for you as shown.

arduino101_Vs15C_00

In the above image click on the OneZeroOne.ino file. This is the 'sketch' that you will using to interact with the board via your USB drive to which the arduino 101 board is connected. It will be a simple, empty template. You can cut and paste any of the relevant sketches. Herein I have used the same sketch I used here to run the 'Blink' project that makes a LED on the arduino 101 board to flash on and off. It is one of the example applications, something akin to a 'Hello World'.

Here is the sketch used in this post:


arduino101_Vs2015C_02

When you compile and run this program you may get a message like this.

arduino101_Vs2015C_02

You may also get the messages from the serial port as shown as you connect/disconnect or run the program:


arduino101_Vs2015C_04

The arduino extension you added will also add a arduino specific toolbar as shown which makes it easy to work with the board.
arduino101_Vs2015C_05

There are couple of ways to build the program and upload it to the board. Here is one way using the main menu.
arduino101_Vs2015C_06

 As soon as you upload the second LED on the board starts blinking.


Monday, May 23, 2016

How can you program IOT controllers using JavaScript?

Arduino boards can be programmed using Arduino software and Intel IOT boards can be programmed using Intel XDK IOT. Using JavaScript to program controllers would be very useful as most browsers are HTMl5 compliant. The Johnny-Five Robotics and IOT program is an interesting option.

Johnny-Five is the JavaScript Robotics & IOT platform released by the Bocoup group. Johnny-Five is maintained by a growing number of talented developers.

What is Bocoup?
Bocoup  is a group that championed the cause of Open tools and Work Flow. They really seems to have people with very varied and diverse talents to tackle web, data, and visualization.

How does Johnny-Five handle the Hello World (or Blink for that matter)?
It looks like 1-2-3 really.

1. Install Node.js(Prefer 4.2.1 LTS)
2. Setup your board
3. Run: npm install johnny-five

What else is needed?

You also need to run the Firmata protocol for the controller board to communicate with the computer.
Interestingly Johnny-Five can handle over 30 different arduino compatible boards from the likes of Raspberry, Intel, Arduino, Sparkfun and many more.

This is very impressive indeed as each of these boards are handled by their vendors like Arduino, Intel and others.

How about non-arduino boards?

There are platform specific IO Plugins (for example, Galileo-IO plugin) .These plugins can speak the language of the platform as they implement Firmata compatible interfaces.

You will be hearing more about Johnny-Five in my blogs, here and here, keep reading....

Thursday, May 19, 2016

How do you connect an Arduino 101 to your computer to check it out?

In this post I discuss a bit about Arduino 101 and describe how different is it from the Arduino UNO. It would be helpful if you would review some previous details here and here.

First of all Arduino 101 has the same kind of peripherals as the Arduino UNO. UNO had an ATmega328 which has been replaced by Intel's Curie(TM). The board has two cores running at 32 MHZ, a x86 (Quark) and an ARC (Argonaut RISC Core). In addition to having low-energy consumption, Arduino has on-board Bluetooth Low Energy and 6-axis accelerometer/gyroscope capability.


These are steps you need to take for checking it out:

Step 1:
Buy the board and it is not very expensive. It is small and looks very much like the Arduino UNO


Lots of places to buy from, http://store-usa.arduino.cc/. I bought mine from Amazon.com as they bring it to my door.

Step 2:
You need to get the Arduino software Arduino IDE 1.6.7.later to program this board.

Review this post to get the download link and some installation information:

http://hodentekhelp.blogspot.com/2016/05/is-there-arduino-program-to-use-with.html


3. After installing Arduino IDE as in 2. above, you should install the Intel Curie Boards using Arduino Boards Manager.

This is after launching the Arduino IDE


Go to the Board Manager. Many different boards work with software and you will be using Arduino 101 which is not present in the default installation of Arduino 1.6.8. That is why you require this step.


Click on the Board Manager... to open the next window. Scroll down to see the Intel boards. Choose the one displaying Arduino 101. Click on the Install button. It begins to download. Quite a big file and can be slow.


Halfway of the installation you will get this Windows Security message. Click install.


You do not get any other message. Click Close on the Board Manager screen. Now in the Board manager screen you should see the board at the very bottom of the drop-down.


Attach the Arduino 101 board using the USB connector as shown. The green light at bottom left shows that the board is powered and ready.


Now you make sure that the Arduino 101 is chosen in the board.

From File choose the Blink example as shown. This Arduino Program (also known as a sketch) will make a LED on the board to blink on and off.

When you choose this the following Sketch will appear in the Arduino IDE as shown (review the title of the next window).


Form the menu Sketch choose Verify and Compile. If there are no errors it should compile.

Now click on Sketch | Upload. The program now goes to the board and get executed. After a slight delay, you will see the LED blinking as shown in the video.


Monday, May 9, 2016

Is there an Arduino program to use with Arduino 101?
If you intend using the more recent Arduino hardware such as Arduino 101 you better use the more recent Arduino IDE 1.6.8.

In a previous post you reviewed using the Visual Studio 2015 with Arduino Extension. In this post you will learn how to download the latest version and install it on Windows 10 computer.

You download arduino-1.6.8-Windows.exe from here.


You begin installing by double clicking the executable.
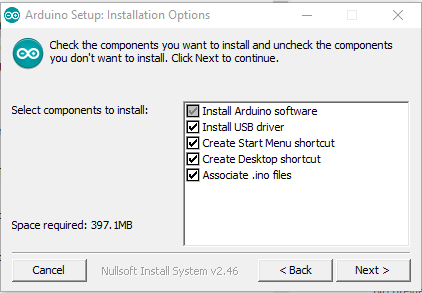
Here are some of the installation time screen shots for your reference:


On Windows 10 it also adds a desktop App to the All Apps menu.

You launch it by double clicking the shortcut or the desktop app or the shortcut in the installation folder.
 
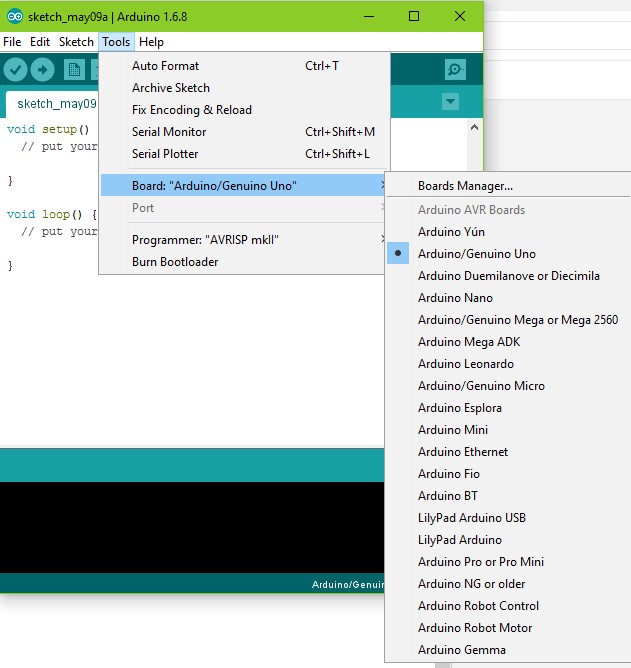
Click Tools in the main menu to find the Board Manager link ass shown. In the drop-down you can see the various hardware that can be accessed.

Click Board Manager... to open another drop-down. Scroll down to view the Arduino 101 by Intel.

That's all.


Wednesday, May 4, 2016

What is the difference between Arduino UNO and Arduino 101?

First of all Arduino (iconic name) is common to both of them and both of them use the same kind of connectors and periferals.

Arduino UNO used the ATmega 328 processor but the heart of Arduino 101 is an Intel Curie board with two cores, an x86 (Quark) and an ARC Argonaut RISC Core). These two cores enable high performance and low power-consumption.

Arduino UNO adds on-board Bluetooth Low Energy and 6-axis accelerometer / gyroscope capabilities. This means Arduino 101 is more powerful than Arduino UNO in terms of remote (Bluetooth) operation and accelerometer capability. Arduino UNO has no such capability.

In order to access Arduino UNO remotely you would need a Wi-Fi shield.

Arduino 101 has libraries for the following embedded peripherals :

CureBLE (to control Bluetooth Low Energy module)
CurieIMU(to control the 6-axis accelerometer + gyro)
Curie Timer One (to control Timer functions)

The above libraries are installed with Intel Curie core.

In order to work with the Arduino 101 you would need Arduino 1.6.7 software or later.

In my previous post you have seen how to work with Visual Studio 2015 Community for Arduino. You can use Visual Studio Community with Arduino 101 as displayed here:


VS2015_Arduino101.jpg
In my next post I will discuss how to install the latest version of Arduino to work with Arduino 101.

Monday, May 2, 2016

How do you create a Arduino Project in Visual Studio 2015 Community?

Arduino has a number of hardware products (microcontrollers. SoC, etc) that can be used for various end uses including the Internet Of Things (IoT).

Visual Studio can be used to create Arduino projects wherein the application created using the Visual Studio can be used to control like in robotics, garage openers, light dimmers, etc. to mention a few.

The more recent Visual Studio editions that are free and well suited for Arduino projects are the two Community Editions, Visual Studio 2013 Community and Visual Studio 2015 Community.

The first thing you need is to install Visual Studio (either 2013 or 2015). If you want to know details for 'how' follow these two posts.

http://hodentek.blogspot.com/2015/07/installing-visual-studio-2015.html
http://hodentek.blogspot.com/2014/11/you-get-all-this-for-free-in-visual.html

This post considers the Visual Studio 2015 Community(VS2015C).
A default install of VS2015C does not have the 'hooks' to create a Arduino Project. You will not find it in the 'New Project' templates.

You need to install the Arduino Extension for Visual Studio 2015. You can get an idea how to do it by following this Swaytorial:
https://docs.com/jayaram-krishnaswamy/4701/install-arduino-extension-to-visual-studio-2015

Once you install this you can create an Arduino Project from File | New Arduino Project.


NewProj.png

Click and you have created a project. It is that easy.

NewArduinoProj

You just need to give a name to the project and the template is ready.
I have a few projects created with the VS2013C on my blog which you may want to review.

Analog Serial Readout
http://hodentek.blogspot.com/2015/05/debugging-arduino-from-visual-studio.html

Thursday, August 20, 2015

What are the various Windows IOT Devices presently available?

Internet of things is a business that is going to be a large part of our universe touching all aspects of our life. Windows 10 is a one stop device agnostic OS.  Windows 10 IoT core is tailored for the Windows 10 environment.

Windows 10 IoT Core can be used with different kinds of electronic harware/software .

Here is a listing:


Wednesday, June 10, 2015

How to read potentiometer output from Arduino using Visual Basic?

Let us assume you want to read the voltage from a potentiometer which is connected to the Arduino UNO. Let us further assume that it is analog voltage that you need to read.

If you are new to Arduino and Visual Studio read the following:
http://hodentek.blogspot.com/search?q=Arduino

Arduino has a 'sketch' for this specific case shown next:
------------
/*
  AnalogReadSerial
  Reads an analog input on pin 0, prints the result to the serial monitor.
  Attach the center pin of a potentiometer to pin A0, and the outside pins to +5V and ground.

 This example code is in the public domain.
 */

// the setup routine runs once when you press reset:
void setup() {
  // initialize serial communication at 9600 bits per second:
  Serial.begin(4800);
}

// the loop routine runs over and over again forever:
void loop() {
  // read the input on analog pin 0:
  int sensorValue = analogRead(A0);
  // print out the value you read:
  Serial.println(sensorValue);
  delay(1000);        // delay in between reads for stability

}
--------
You should first set up the circuit required for this sketch which requires the two ends of potentiometer tied to 0 and 5V of the Arduino and the center leg (has the variable voltage) depending on the potentiometer setting tied to the terminal A0 on the Arduino Uno board.

The Arduino must be connected to the USB port of your laptop/desktop which has Visual Studio appropriate for working with arduino Uno.(ref).

Once this is set up, run the sketch on Visual Studio and verify that you can monitor the potentiometer reading converted to digits (this is done by the sketch).

Now create a new Visual Basic Windows Form project and place controls on the form as shown here. It is essential that you add a SerialPort control as well from the Toolbox.

Here is the project folder:

Here is the Form1 of this project:


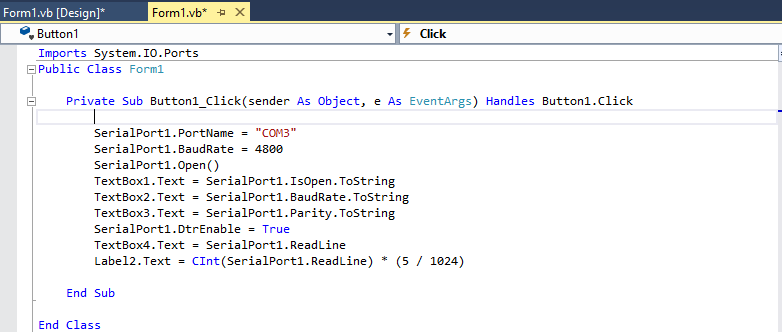
Here is the code for the button click event:


Here is the reading of the potentiometer:


If you see this message just ignore it:
The thread 0x2f14 has exited with code 259 (0x103).
The thread 0x1d2c has exited with code 259 (0x103).
The thread 0x30ec has exited with code 259 (0x103).
The thread 0x3ab4 has exited with code 259 (0x103).


Tuesday, May 26, 2015

How do you add a new sketch library to Arduino in Visual Studio?


The previous post shows all the libraries in the Arduino 163 nightly builds as seen in the Visual Studio 2013 Community edition's IDE. You can add the library in the list using Visual Studio as shown in the previous post.

What if you want to add a library that is not in the list?

The first thing is for you to find the library or write one.

Let us say, I need to add the WaveHC library. You may want to know what WaveHC library can do. Well WaveHC is an Arduino Library for the Adafruit Wave shield. WaveHC library has four C++ classes.

* SDCard Library
* FATReader
* WaveHC
* WaveUtil

This library turns Arduino into things you can do with audio.

Where do you find WaveHC?

You can find WaveHC here:
I downloaded the wavehc20090418.zip file to work with (hope!) Arduino UNO.

Here is a screenshot.
After downloading I extracted the folder WaveHC and moved it to the following location where it was saved (WaveHC was added to the install directory of Arduino).

C:\Users\Jayaram\Desktop\Arduino163\arduino-nightly-windows\arduino-nightly\libraries

Now I launch Visual Studio and open the sketch project I want to add the library and refresh the libraries (you get a message that the Toolchain reload is complete). It is now added to the libraries accessible via Visual Studio). Now WaveHC is available to add to my existing project:

Monday, May 25, 2015

How to add Sketch libraries to an Arduino Project in Visual Studio?

You can add other libraries to your Arduino sketch project using Visual Studio 2013 Community edition.It is quite easy to add as shown in this post.

Read more about Arduino and Visual Studio here, here, and here.

First click on the Project (not the Solution Explorer) and then click Project in the main menu as shown.

ArduinoImport01.png

Click Add/Import Sketch Library followed by Core in the menu to open the list of libraries you can add on to your project as shown.


ArduinoImport02.png

I just added a Ethernet library and you can see a number of Ethernet related files added to my project.

ArduinoImport03.png

Tuesday, May 5, 2015

What version of Visual Studio do you need to work with Arduino?


You need to install the Visual Studio 2013 Free (Community Edition) or higher prior to installing Visual Micro, the Arduino IDE.

Visual Micro can be installed from here:
http://www.visualmicro.com/page/Arduino-Visual-Studio-Downloads.aspx

There are lots of versions, OS dependencies, etc. read carefully what you are downloading.
Visual Micro, the latest Arduino IDE version 163+ installs an .msi file (arduinoforvisualstudio.msi).
This file must be installed to work with Arduino projects with Visual Studio IDE.

Read more on Visual Studio 2013 Community here:
http://hodentek.blogspot.com/2014/11/free-visual-studio-community-2013-for.html
http://hodentek.blogspot.com/2014/11/you-get-all-this-for-free-in-visual.html