Showing posts with label Arduino 101. Show all posts

Thursday, May 3, 2018

What is Arduino Create?

It is a web based platform which you can use to connect, create, and colloborate to work with Arduino and related products.

This online platform (you will need to create username/password) enables Makers and Professional Developers to:

Write code
Access content
Configure boards(hardware)
Share Projects

Before Arduino Create, all these activities were fragmented and distributed over various tools, screens, etc.

Read all posts on Arduino on this site: http://hodentekhelp.blogspot.com/search?q=arduino

 Simply put the developer experience is now highly organized using just one tool-Arduino Create.

The next image explains it all.


Main Features:
Always up-to-date online iDE
Offers in-depth guided flows
Configure easily Web Editor and Cloud
Provides Arduino's Educational Program

Tuesday, May 31, 2016

Can you program Arduino 101 with Visual Studio 2015?

The short answer is, Yes you can.

If you rather not use Visual Studio 2015, you could also use the program from Arduino.

But Visual studio does lot more than Arduino Program.

Here is the how and the long answer regarding Arduino with Visual studio..

First thing you need to have is the correct version (if you follow my advice) of Visual Studio. Get the Visual Studio 2015 Community (What I have is the same but with Update 2).

If you do not have, no problem. Read this post.


For Arduino to work with Visual Studio 2015 Community (VS2015C), you need to install the Arduino Extensions for Visual Studio. A default install of VS2015C does not have the 'hooks' to create a Arduino Project. You will not find it in the 'New Project...' templates.

You need to install the Arduino Extension for Visual Studio 2015. You can get an idea how to do it by following this Swaytorial:

Of course you need to buy the Arduino 101. It is available from many sources. Connect it to computer with a USB cable as shown.


With all of the above in place, it is very easy to run the board from Visual Studio 2015 Community.

 Open Tools menu as shown to access the Extensions and Updates... submenu.

arduino101_Vs15C

The extension immediately brings in the support for Arduino 101.


Start a new project as shown here:

arduino101_Vs15C_000

Provide a name for the project (herein OneZeroOne)and click OK. The project with folders will be created for you as shown.

arduino101_Vs15C_00

In the above image click on the OneZeroOne.ino file. This is the 'sketch' that you will using to interact with the board via your USB drive to which the arduino 101 board is connected. It will be a simple, empty template. You can cut and paste any of the relevant sketches. Herein I have used the same sketch I used here to run the 'Blink' project that makes a LED on the arduino 101 board to flash on and off. It is one of the example applications, something akin to a 'Hello World'.

Here is the sketch used in this post:


arduino101_Vs2015C_02

When you compile and run this program you may get a message like this.

arduino101_Vs2015C_02

You may also get the messages from the serial port as shown as you connect/disconnect or run the program:


arduino101_Vs2015C_04

The arduino extension you added will also add a arduino specific toolbar as shown which makes it easy to work with the board.
arduino101_Vs2015C_05

There are couple of ways to build the program and upload it to the board. Here is one way using the main menu.
arduino101_Vs2015C_06

 As soon as you upload the second LED on the board starts blinking.


Thursday, May 19, 2016

How do you connect an Arduino 101 to your computer to check it out?

In this post I discuss a bit about Arduino 101 and describe how different is it from the Arduino UNO. It would be helpful if you would review some previous details here and here.

First of all Arduino 101 has the same kind of peripherals as the Arduino UNO. UNO had an ATmega328 which has been replaced by Intel's Curie(TM). The board has two cores running at 32 MHZ, a x86 (Quark) and an ARC (Argonaut RISC Core). In addition to having low-energy consumption, Arduino has on-board Bluetooth Low Energy and 6-axis accelerometer/gyroscope capability.


These are steps you need to take for checking it out:

Step 1:
Buy the board and it is not very expensive. It is small and looks very much like the Arduino UNO


Lots of places to buy from, http://store-usa.arduino.cc/. I bought mine from Amazon.com as they bring it to my door.

Step 2:
You need to get the Arduino software Arduino IDE 1.6.7.later to program this board.

Review this post to get the download link and some installation information:

http://hodentekhelp.blogspot.com/2016/05/is-there-arduino-program-to-use-with.html


3. After installing Arduino IDE as in 2. above, you should install the Intel Curie Boards using Arduino Boards Manager.

This is after launching the Arduino IDE


Go to the Board Manager. Many different boards work with software and you will be using Arduino 101 which is not present in the default installation of Arduino 1.6.8. That is why you require this step.


Click on the Board Manager... to open the next window. Scroll down to see the Intel boards. Choose the one displaying Arduino 101. Click on the Install button. It begins to download. Quite a big file and can be slow.


Halfway of the installation you will get this Windows Security message. Click install.


You do not get any other message. Click Close on the Board Manager screen. Now in the Board manager screen you should see the board at the very bottom of the drop-down.


Attach the Arduino 101 board using the USB connector as shown. The green light at bottom left shows that the board is powered and ready.


Now you make sure that the Arduino 101 is chosen in the board.

From File choose the Blink example as shown. This Arduino Program (also known as a sketch) will make a LED on the board to blink on and off.

When you choose this the following Sketch will appear in the Arduino IDE as shown (review the title of the next window).


Form the menu Sketch choose Verify and Compile. If there are no errors it should compile.

Now click on Sketch | Upload. The program now goes to the board and get executed. After a slight delay, you will see the LED blinking as shown in the video.


Monday, May 9, 2016

Is there an Arduino program to use with Arduino 101?

If you intend using the more recent Arduino hardware such as Arduino 101 you better use the more recent Arduino IDE 1.6.8.

In a previous post you reviewed using the Visual Studio 2015 with Arduino Extension. In this post you will learn how to download the latest version and install it on Windows 10 computer.

You download arduino-1.6.8-Windows.exe from here.


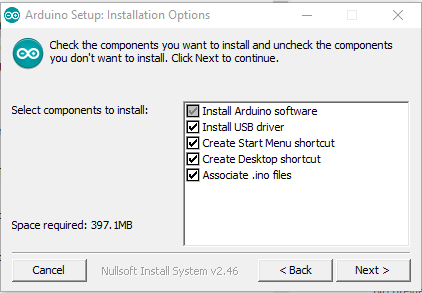
You begin installing by double clicking the executable.
Here are some of the installation time screen shots for your reference:


On Windows 10 it also adds a desktop App to the All Apps menu.

You launch it by double clicking the shortcut or the desktop app or the shortcut in the installation folder.
 
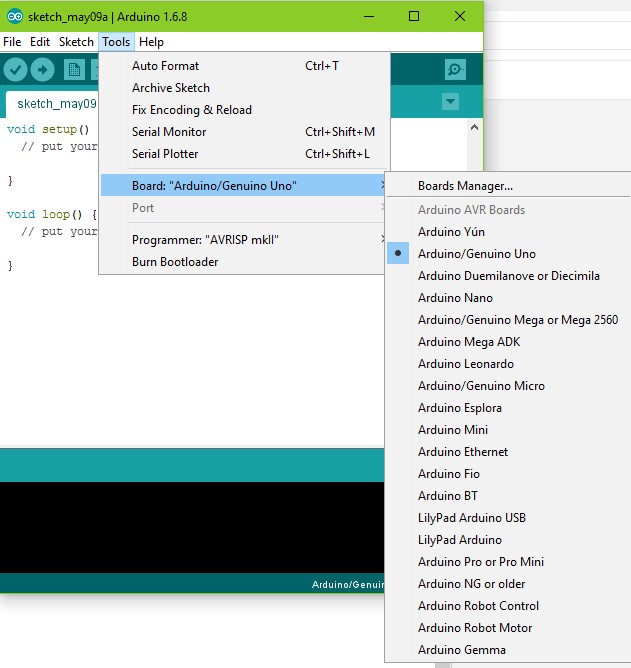
Click Tools in the main menu to find the Board Manager link ass shown. In the drop-down you can see the various hardware that can be accessed.

Click Board Manager... to open another drop-down. Scroll down to view the Arduino 101 by Intel.

That's all.