In this post I discuss a bit about Arduino 101 and describe how different is it from the Arduino UNO. It would be helpful if you would review some previous details here and here.
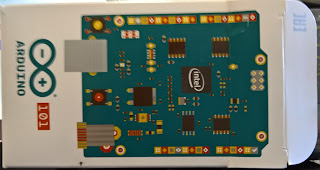
First of all Arduino 101 has the same kind of peripherals as the Arduino UNO. UNO had an ATmega328 which has been replaced by Intel's Curie(TM). The board has two cores running at 32 MHZ, a x86 (Quark) and an ARC (Argonaut RISC Core). In addition to having low-energy consumption, Arduino has on-board Bluetooth Low Energy and 6-axis accelerometer/gyroscope capability.
These are steps you need to take for checking it out:
Step 1:
Buy the board and it is not very expensive. It is small and looks very much like the Arduino UNO
Lots of places to buy from, http://store-usa.arduino.cc/. I bought mine from Amazon.com as they bring it to my door.
Step 2:
You need to get the Arduino software Arduino IDE 1.6.7.later to program this board.
Review this post to get the download link and some installation information:
http://hodentekhelp.blogspot.com/2016/05/is-there-arduino-program-to-use-with.html

3. After installing Arduino IDE as in 2. above, you should install the Intel Curie Boards using Arduino Boards Manager.
This is after launching the Arduino IDE

Go to the Board Manager. Many different boards work with software and you will be using Arduino 101 which is not present in the default installation of Arduino 1.6.8. That is why you require this step.


Click on the Board Manager... to open the next window. Scroll down to see the Intel boards. Choose the one displaying Arduino 101. Click on the Install button. It begins to download. Quite a big file and can be slow.


First of all Arduino 101 has the same kind of peripherals as the Arduino UNO. UNO had an ATmega328 which has been replaced by Intel's Curie(TM). The board has two cores running at 32 MHZ, a x86 (Quark) and an ARC (Argonaut RISC Core). In addition to having low-energy consumption, Arduino has on-board Bluetooth Low Energy and 6-axis accelerometer/gyroscope capability.

These are steps you need to take for checking it out:
Step 1:
Buy the board and it is not very expensive. It is small and looks very much like the Arduino UNO
Lots of places to buy from, http://store-usa.arduino.cc/. I bought mine from Amazon.com as they bring it to my door.
Step 2:
You need to get the Arduino software Arduino IDE 1.6.7.later to program this board.
Review this post to get the download link and some installation information:
http://hodentekhelp.blogspot.com/2016/05/is-there-arduino-program-to-use-with.html

3. After installing Arduino IDE as in 2. above, you should install the Intel Curie Boards using Arduino Boards Manager.
This is after launching the Arduino IDE

Go to the Board Manager. Many different boards work with software and you will be using Arduino 101 which is not present in the default installation of Arduino 1.6.8. That is why you require this step.


Click on the Board Manager... to open the next window. Scroll down to see the Intel boards. Choose the one displaying Arduino 101. Click on the Install button. It begins to download. Quite a big file and can be slow.

Halfway of the installation you will get this Windows Security message. Click install.

You do not get any other message. Click Close on the Board Manager screen. Now in the Board manager screen you should see the board at the very bottom of the drop-down.

Attach the Arduino 101 board using the USB connector as shown. The green light at bottom left shows that the board is powered and ready.

Now you make sure that the Arduino 101 is chosen in the board.
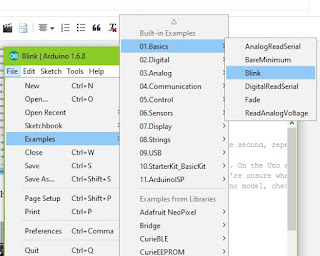
From File choose the Blink example as shown. This Arduino Program (also known as a sketch) will make a LED on the board to blink on and off.

When you choose this the following Sketch will appear in the Arduino IDE as shown (review the title of the next window).

Form the menu Sketch choose Verify and Compile. If there are no errors it should compile.
Now click on Sketch | Upload. The program now goes to the board and get executed. After a slight delay, you will see the LED blinking as shown in the video.
No comments:
Post a Comment