Saturday, January 18, 2014

What is the easiest way to transfer a photo album from iPad to a Windows PC?

There are quite a few Apps available to carry out this task, but they do not work as advertised and may need troubleshooting. They try to transfer files using the existing WIFI.

 Photo Transfer APP

Backsup albums from iPhone, iPad,iPad mini and iPod Touch to Mac
use Photo Transfer APP
http://www.phototransferapp.com/help/mac/backup-albums/

There is one for PC as well, follow this link:
http://www.phototransferapp.com/win/

I did not try the above as I was not sure if it would work (I had tried two others that did not work in the time I had allotted myself to finish transferring and to make them work required reading a long connection issues list: transmitr APP and WiFi photo) and had found an easier way.

There is only one step in this procedure:

You do not need anything other than what you should be having.

Hook your iPad (firmware 7.0.4) connector's USB end to the Windows OS computer's USB Drive (assume that the other end is connected to iPad). The Windows computer recognizes the connection and now click Start | Computer and you should be able to see your iPad as shown.


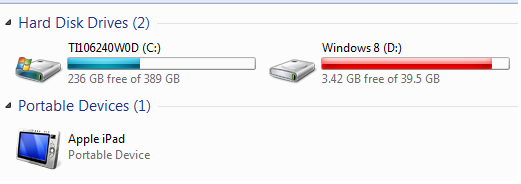
If you open the DCIM folder that is displayed when you double click Apple iPad in the above it will be empty.

After sometime you get an iPad message, Trust this computer?
Click Trust

Then the Autoplay window is displayed as shown.


Now click Open device to view files. This will open the internal storage as shown which contains your photos and it will not display the folders you might have created on the iPad.


That is all there is to it!

Friday, January 3, 2014

How do you create a Windows 8.1 recovery drive?

It is always a  good practice to create a recovery disc in case you need to start windows or you encounter starting or installing windows. In Windows 8.1(also in Windows 8) you can create a recovery drive using a USB memory drive.

Follow these steps:

  • Hold down w key and click Windows Key
Search Settings pane will open
  • Search for 'Recovery Drive'
  • Choose 'Create a recovery drive' option from the drop-down list
User Account Control (UAC) will be displayed
  • Click Yes
Recovery Drive window will be displayed with the page heading 'Create a recovery drive'. The
option 'Copy the recovery partition from the PC to the recovery drive' is checked by default.
  • Accept this default and click Next.
Recovery Drive window's next page 'Connect a USB Flash drive' is displayed.
  • Connect a 16GB  USB Flash Drive (8GB Nominal won't do)
  • Click Next
You get a message that everything on the drive will be deleted.
  • Click Create
The drive gets formatted first; utilities will be copied and following this recovery partition will be copied;
 
You get the message that recovery drive is ready. You have the option to delete the recovery
partition on your computer. I did not choose this option.
  • Click Finish.
You will not get any other message.
 
The contents of the recovery drive is as shown.


Wednesday, January 1, 2014

Tuesday, December 24, 2013

What is Soundex?

Soundex is how a name of a person is coded as used in the census for locating a person. It is based on how a name sounds rather than how it is spelled.

The name of the person is converted into a 4 character code, the first character in the code is the first letter of the person's name capitalized. The next three characters (they are number) that follow the rule stated here.

Rule 1:
For letters B,F,P,V                           use the number 1
For letters C,G,,K,Q,S,X,Z               use the number 2
For letters D,T                                  use the number 3
For letter L                                        use the number 4
For letters M and N                         use the number 5
For letter R                                        use the number 6

Rule2:
Disregard the letters A, E, I, O, U, H, W, Y (unless they are the first character in the name)

Example:
If the person's name is johnson, the first character in the soundex code is J

As to the rest of the characters in the code, using the above rules we have for johnson the Soundex code J525

The Soundex for Johnson is reduced to JNSN since O and H are not counted and N=5 and S=2 and J is the first character.

By the same rule, the Soundex code for Iowa is I000
Get more info from here:
http://www.archives.gov/research/census/soundex.html

and here:
http://www.ironrangeresearchcenter.org/genealogy/help/soundex/index.htm

USAGE:


Thursday, December 19, 2013

Can you run Windows on MAC?

Yes you can. Virtualization makes it possible

Parallels has come out with Desktop 9 for MAC which makes it easy to run both operating systems on a MAC. It costs around $80 presently.

Here is a video from Parallels you want to see:


Follow up on this link for details:
http://www.parallels.com/products/desktop/

Monday, December 16, 2013

Can you get data from SQL Anywhere 16 using MS Excel?

The answer is yes. SQL Anywhere installation adds a ODBC DSN to the computer. MS Query is MS Excel can connect to this data source as shown in this post.

In a number of previous posts we have seen how to access data on SQL Anywhere Server using either ODBC or ADO.NET connectivity. Follow the links here:
http://hodentek.blogspot.com/2013/10/connecting-to-sql-anywhere-16-using.html

http://hodentek.blogspot.com/2013/09/do-you-need-to-connect-to-sql-anywhere_24.html

http://hodentek.blogspot.com/2013/09/do-you-need-to-connect-to-sql-anywhere_20.html

http://hodentek.blogspot.com/2013/09/do-you-need-to-connect-to-sql-anywhere.html

http://hodentek.blogspot.com/2013/08/do-you-need-to-connect-to-sql-anywhere.html

1. Start the SQL Anywhere Server from its link as shown.

 
The Server starts up as shown.


2. Launch MS Access (in the present case MS Access 2010 Professional Plus).
3. Click menu item Data. Click From Other sources and from the drop-down menu
   click From Microsoft Query as shown.

4. Choose Data Source window gets displayed as shown.


5. Click demo* and click OK.
Query Wizard - Choose Columns window  is displayed as shown.

6. Click Contacts (for example) and using the > button transfer all columns to the Columns in your query window.

7. Click Next
Query wizard - Filter Data window is displayed is displayed as shown.

8. If you need to filter data go ahead and choose what to filter. Here no filtering is done.

9.Click Next.
Query Wizard - Sort Order window is displayed as shown.

10. Click Next.
Query wizard - Finish is displayed.

11. Accept default and click Finish. (not shown)

The Import Data window is displayed as shown.

12. If you accept the default location and click OK, the program brings data beginning the cell A1 as shown.

That is all there is to it.


Sunday, December 15, 2013

What is the difference between MS Query and Power Query?

As the name suggests Power Query is more powerful than MS Query. MS Query handles only ODBC data sources but Power Query can handle lot more.

Some details here:
http://hodentek.blogspot.com/2013/12/what-is-microsoft-power-query.html

Both MS Query and Power Query can be accessed in Microsoft EXCEL.

MS Query and Power Query in MS EXCEL 2010 Professional Plus and x32 bit


You have to install the EXCEL add-in for POWER Query from here:
http://www.microsoft.com/en-us/download/details.aspx?id=39379


Here is the ribbon tab for Power Query: