Well, small money is what I have in my pocket and money is what Bill Gates has in his account.

No, I am kidding.
The value of money data type ranges from:
-922,337,203,685,477.5808 to 922,337,203,685,477.5807(requires 8 bytes)
(-ve when you enter chapter 5, I am kidding!)

The value of smallmoney ranges from:
- 214,748.3648 to 214,748.3647 (requires 4 bytes)
The readers of my articles on several forums asks questions regarding something or the other and I do answer them promptly. However I feel the answers should be shared among a larger group of people. I think this blog will make this possible.
Sunday, November 21, 2010
What is the difference between smallmoney and money data types in SQL Server 2008?
Thursday, August 5, 2010
Compiling Java in Windows 7
The java compiler javac from the latest JVM is used here. It should be downloaded from here:
http://www.oracle.com/technetwork/java/javase/downloads/jdk6-jsp-136632.html
Click Start|Computer
Right click Computer and choose Properties
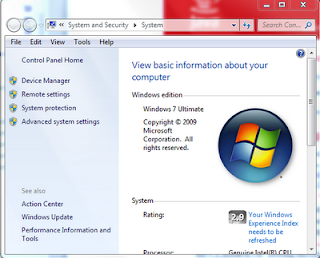
In the System window displayed click Advanced system settings.
The System Properties window is displayed as shown.
Click Environment variables...button
In the Environmental Variables window
Highlight the System variable Path.
Click Edit...
The Edit System Variable window is displayed.
Copy the variable value to Notepad
To add the java compiler to this list append the path to its directory
at the end like: ;C:\Program Files\Java\jdk1.6.0_21\bin\;
Click OK to this window
Click OK to the Environment Variables window
Click OK to the System Properties window
Close the System window.
Now open a cmd window (DOS screen) and verify that you can run javac. If you don't provide a file name you get the following displayed. You can run from other directories as well.
http://www.oracle.com/technetwork/java/javase/downloads/jdk6-jsp-136632.html
Click Start|Computer
Right click Computer and choose Properties

In the System window displayed click Advanced system settings.
The System Properties window is displayed as shown.
Click Environment variables...button
In the Environmental Variables window
Highlight the System variable Path.
Click Edit...
The Edit System Variable window is displayed.
Copy the variable value to Notepad
To add the java compiler to this list append the path to its directory
at the end like: ;C:\Program Files\Java\jdk1.6.0_21\bin\;
Click OK to this window
Click OK to the Environment Variables window
Click OK to the System Properties window
Close the System window.
Now open a cmd window (DOS screen) and verify that you can run javac. If you don't provide a file name you get the following displayed. You can run from other directories as well.
Monday, June 28, 2010
How do you create an application in IIS 7.0?
Now that Windows 7 has become very popular it is easy to host web applications on IIS 7. You can use the IIS 7 interface to create an empty web application.
In the Search programs and files box, after you click Start in the desktop enter IIS and initiate a search. You will see both IIS 7 and IIS 6 in the response at the top.
Click IIS 7. The IIS Manager gets displayed as shown.
Right click Default Web Site to display the menu shown.
Click Add Application...menu item. The Add Application window is displayed as shown.
Provide an alias of your choosing. Herein TestAppIIS. Accept the default for application pool.
Click on the ellipsis button (...) for the physical path.
In the folder browser select a folder for the files (you can also create an empty folder). Click OK. This gets into the Add Application window you saw earlier.
Hit Test Settings...button.
You will get a warning as to the account access to the file.
Click on Connect as... button.
The Connect as window shows up. Choose the option (specific user) shown next.
Click on the Set... button.
In the Set Credentials window enter the credentials (herein the administrator of this computer)as shown.
When you hit OK, the information gets into Connect as window.
Click OK. You will be returned to the Add Application window.
Click Test Settings... button one more time.
This time it looks Ok.
Click Close. Click OK on Add Application.
Your application will now be available in the Default Web Site as shown here.
Tuesday, June 22, 2010
What does the utility aspnet_regsql.exe do?
The utility aspnet_regsql.exe was introduced in Microsoft .NET Framework 2.0. This utility creates a SQL Database to support forms' authentication in asp.net web applications to store site users' Membership related authentication information in an SQL Server database. Users accessing a web site which needs authentication by entering username and password in a web form presented to the user will have their information stored in a local copy of SQL Server against which they will be authenticated.
The help file for this utility can be accessed using the command as shown :
C:\Windows\Microsoft.NET\Framework\v2.0.50727>aspnet_regsql.exe /?
==================================================
Administrative utility to install and uninstall ASP.NET features on a SQL
server.
Copyright (C) Microsoft Corporation. All rights reserved
-? Display this help text.
-W Wizard mode. (Default if no other parameters are specified.)
-S SQL Server instance (SQL Server 7.0 and above) to work with.
-U SQL Server user name to authenticate with; requires -P
option.
-P SQL Server password to authenticate with; requires -U option.
-E Authenticate with current Windows credentials.
-C
Connection string. Instead of specifying a user name,
password, and server name, specify a SQL Server connection
string. The string must not contain a database name unless
otherwise specified.
-sqlexportonly
Generate the SQL script file for adding or removing the
specified features and do not carry out the actual operation.
Can be used with the following options: -A, -R, -ssadd, and
-ssremove.
-A all|m|r|p|c|w Add support for a feature. Multiple values can be specified
together. For example:
-A mp
-A m -A p
all: All features
m: Membership
r: Role manager
p: Profiles
c: Personalization
w: SQL Web event provider
-R all|m|r|p|c|w Remove support for a feature. Multiple values can be
specified together. For example:
-R mp
-R m -R p
all : All features plus all common tables and stored
procedures shared by the features
m: Membership
r: Role manager
p: Profiles
c: Personalization
w: SQL Web event provider
-d Database name for use with application services. If no
database name is specified, the default database "aspnetdb"
is used.
-Q Quiet mode; do not display confirmation to remove a feature.
-d Database name for use with SQL cache dependency in SQL 7.0
and SQL 2000. The database can optionally be specified using
the connection string with the -C option instead. (Required)
-ed Enable a database for SQL cache dependency.
-dd Disable a database for SQL cache dependency.
-et Enable a table for SQL cache dependency. Requires -t option.
-dt Disable a table for SQL cache dependency. Requires -t option.
-t
Name of the table to enable or disable for SQL cache dependency. Requires -et or -dt option. -lt List all tables enabled for SQL cache dependency.
-ssremove Remove support for SQLServer mode session state.
-sstype t|p|c Type of session state support: t: temporary.
Session state data is stored in the "tempdb" database. Stored procedures for managing session are installed in the "ASPState" database. Data is not persisted if you restart SQL. (Default)
p: persisted. Both session state data and the stored procedures are stored in the "ASPState" database.
c: custom. Both session state data and the stored procedures are stored in a custom database. The database name must be specified. -d The name of the custom database to use if -sstype is "c".
=========================================================
Run the following in the DOS screen:
Here SQLExpress is installed in the computer Hodentek3
This utility is generally found in this folder:
C:\Windows\Microsoft.NET\Framework\v2.0.50727The help file for this utility can be accessed using the command as shown :
C:\Windows\Microsoft.NET\Framework\v2.0.50727>aspnet_regsql.exe /?
==================================================
Administrative utility to install and uninstall ASP.NET features on a SQL
server.
Copyright (C) Microsoft Corporation. All rights reserved
-- GENERAL OPTIONS --
-? Display this help text.
-W Wizard mode. (Default if no other parameters are specified.)
-- SQL CONNECTION OPTIONS --
-S SQL Server instance (SQL Server 7.0 and above) to work with.
-U SQL Server user name to authenticate with; requires -P
option.
-P SQL Server password to authenticate with; requires -U option.
-E Authenticate with current Windows credentials.
-C
Connection string. Instead of specifying a user name,
password, and server name, specify a SQL Server connection
string. The string must not contain a database name unless
otherwise specified.
-sqlexportonly
Generate the SQL script file for adding or removing the
specified features and do not carry out the actual operation.
Can be used with the following options: -A, -R, -ssadd, and
-ssremove.
-- APPLICATION SERVICES OPTIONS --
-A all|m|r|p|c|w Add support for a feature. Multiple values can be specified
together. For example:
-A mp
-A m -A p
all: All features
m: Membership
r: Role manager
p: Profiles
c: Personalization
w: SQL Web event provider
-R all|m|r|p|c|w Remove support for a feature. Multiple values can be
specified together. For example:
-R mp
-R m -R p
all : All features plus all common tables and stored
procedures shared by the features
m: Membership
r: Role manager
p: Profiles
c: Personalization
w: SQL Web event provider
-d Database name for use with application services. If no
database name is specified, the default database "aspnetdb"
is used.
-Q Quiet mode; do not display confirmation to remove a feature.
-- SQL CACHE DEPENDENCY OPTIONS (FOR SQL 7.0 AND 2000) --
-d Database name for use with SQL cache dependency in SQL 7.0
and SQL 2000. The database can optionally be specified using
the connection string with the -C option instead. (Required)
-ed Enable a database for SQL cache dependency.
-dd Disable a database for SQL cache dependency.
-et Enable a table for SQL cache dependency. Requires -t option.
-dt Disable a table for SQL cache dependency. Requires -t option.
-t
Name of the table to enable or disable for SQL cache dependency. Requires -et or -dt option. -lt List all tables enabled for SQL cache dependency.
-- SESSION STATE OPTIONS --
-ssadd Add support for SQLServer mode session state.-ssremove Remove support for SQLServer mode session state.
-sstype t|p|c Type of session state support: t: temporary.
Session state data is stored in the "tempdb" database. Stored procedures for managing session are installed in the "ASPState" database. Data is not persisted if you restart SQL. (Default)
p: persisted. Both session state data and the stored procedures are stored in the "ASPState" database.
c: custom. Both session state data and the stored procedures are stored in a custom database. The database name must be specified. -d The name of the custom database to use if -sstype is "c".
=========================================================
How to create the membership database in the local SQL Express Server?
C:\Windows\Microsoft.NET\Framework\v2.0.50727>aspnet_regsql -S Hodentek3\SQLExpress -E -A m
Here SQLExpress is installed in the computer Hodentek3
Monday, June 21, 2010
How do I export and import from MS Excel in XML format ?
MS Excel has import functionality.
You can also use SQL Server 2008 R2's (even earlier versions can be used) Import and Export Wizard.
A more generic tool and that is especially meant or Import/Export of even more complicated situations is MS SQL Server Integration Services.
The following design diagram shows roughly what you should be considering. If you use left two items you will be exporting from Excel to SQL Server and if you use the right two items you will be importing from SQL Server to Excel.
This is all very simply explained in my book which I do recommend.
Thursday, June 17, 2010
What are the default properties of an ASP.NET Web Role in a Windows Azure Cloud Service Application?
There are 4 kinds of web roles and two kinds of worker roles that determine how your Windows Azure Services application functions when deployed to the cloud using Visual Studio 2010. Visual Studio 2008 supports 3 web roles and a worker role.
The following note describes some details of the ASP.NET Web Role in a Windows Azure Cloud Services project.
The default properties in a template cloud project are divided into the following 5 categories:
These properties may be accessed by right clicking the role in the Roles folder of a cloud project.The default configuration assumes the following shown in the next figure:
Using Full Trust option you can run non-.NET code; leverage .NET libraries that require Full Trust and communicate with other internal processes by Named Pipes. However this still does not support you writing to the computer’s registry. Full Trust provides the most flexible trust level for Windows Azure applications.
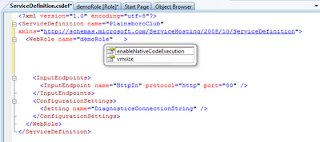
The various options in the user interface can also be chosen in the ServiceDefinition file shown here. By setting enableNativeCodeExecution to true, Full Trust is assured.
The next screen shows the Web Role’s default settings. The picture tells the story. These settings can be accessed programmatically and updated dynamically. You can add more items here or remove existing items.
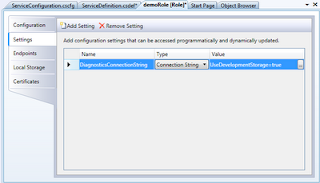
Elements of Settings are also part of the ServiceConfiguration.cscfg and ServiceDefinition.csdef file as shown here.

The default Endpoints setting is HTTP with the name HttpIn is an input endpoint- endpoint that is accessed over the internet as opposed to the internal endpoint which is used for communication within the application. When you use certificates that you upload to the portal you could use the HTTPS option. In the development fabric it is just HTTP. The InputEndpoint was part of the ServiceDefinition.csdef file.
The default LocalStorage setting is shown in the next figure. The LocalStorage is the space available in the file system where some resources can be placed to be used by the application.
By default there are no certificates for the HTTPS requests. If a certificate is used then the HTTPS should be enabled in the configuration file or setting.
The following note describes some details of the ASP.NET Web Role in a Windows Azure Cloud Services project.
The default properties in a template cloud project are divided into the following 5 categories:
- Configuration
- Settings
- Endpoints
- Local Storage
- Certificates
These properties may be accessed by right clicking the role in the Roles folder of a cloud project.The default configuration assumes the following shown in the next figure:
Using Full Trust option you can run non-.NET code; leverage .NET libraries that require Full Trust and communicate with other internal processes by Named Pipes. However this still does not support you writing to the computer’s registry. Full Trust provides the most flexible trust level for Windows Azure applications.
The various options in the user interface can also be chosen in the ServiceDefinition file shown here. By setting enableNativeCodeExecution to true, Full Trust is assured.

The next screen shows the Web Role’s default settings. The picture tells the story. These settings can be accessed programmatically and updated dynamically. You can add more items here or remove existing items.

Elements of Settings are also part of the ServiceConfiguration.cscfg and ServiceDefinition.csdef file as shown here.

The default Endpoints setting is HTTP with the name HttpIn is an input endpoint- endpoint that is accessed over the internet as opposed to the internal endpoint which is used for communication within the application. When you use certificates that you upload to the portal you could use the HTTPS option. In the development fabric it is just HTTP. The InputEndpoint was part of the ServiceDefinition.csdef file.
The default LocalStorage setting is shown in the next figure. The LocalStorage is the space available in the file system where some resources can be placed to be used by the application.
By default there are no certificates for the HTTPS requests. If a certificate is used then the HTTPS should be enabled in the configuration file or setting.
Friday, June 4, 2010
What is Windows Azure and how can I develop an application for Azure?
Just like Windows desktop or lap top, the Windows Azure operating system supports applications deployed to the Windows Azure Cloud Platform.
Well it is not exactly sitting in the cloud and in fact the whole hardware is in several Microsoft Data Centers around the world. Your application will be working within one of those centers. You naturally choose one nearest to you. It has several components and if you want to know more about it you better visit this link here.
Now as to developing applications for Windows Azure there are two possibilities. You could develop an application and go through a simulated environment on the ground (in fact in your own computer ('Box'), or you could develop the application in your computer in the simulated environment ('called the development fabric') and then deploy it to your windows Azure Hosted site. This is a service you must buy, just like your cell phone.
In either case, you need to have one of the following installed on your machine:
But you must also download the Windows Azure Tools for Microsoft Visual Studio from here.
In order to help you out, I have a few screen shots saved when I installed it on my computer which is Windows 7 on a ACER Notebook with 3GB memory and a 288 GB Hardrive.
Start with your Visual Studio 2010 RC
This is a fresh installation. Windows Azure is not installed yet. You see the button "Enable Windows Azure Tools" when I chose Cloud in the Installed templates. Click on that.
This opens the site where you install from right within VS2010 as shown here.
Now click that button for download. You go to the site whose link we saw earlier. Click on that. The download starts. Save it to any location you like. This file VSCloudService.exe is important.
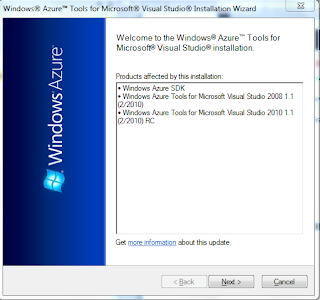
Note what all you get when you install. Click Next>.
Since you started with VS2010 which is still open it is complaining. I closed out of VS2010 at this point.
But still I did not go away. I just refreshed it couple of times and voila.
When it finally finished I am seeing this,
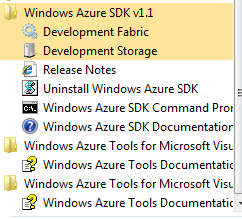
Well I am cooking now.
Well it is not exactly sitting in the cloud and in fact the whole hardware is in several Microsoft Data Centers around the world. Your application will be working within one of those centers. You naturally choose one nearest to you. It has several components and if you want to know more about it you better visit this link here.
Now as to developing applications for Windows Azure there are two possibilities. You could develop an application and go through a simulated environment on the ground (in fact in your own computer ('Box'), or you could develop the application in your computer in the simulated environment ('called the development fabric') and then deploy it to your windows Azure Hosted site. This is a service you must buy, just like your cell phone.
In either case, you need to have one of the following installed on your machine:
- Visual Studio 2008 SP1 or
- Visual Studio 2010 RC
But you must also download the Windows Azure Tools for Microsoft Visual Studio from here.
In order to help you out, I have a few screen shots saved when I installed it on my computer which is Windows 7 on a ACER Notebook with 3GB memory and a 288 GB Hardrive.
Start with your Visual Studio 2010 RC
This is a fresh installation. Windows Azure is not installed yet. You see the button "Enable Windows Azure Tools" when I chose Cloud in the Installed templates. Click on that.
This opens the site where you install from right within VS2010 as shown here.
Now click that button for download. You go to the site whose link we saw earlier. Click on that. The download starts. Save it to any location you like. This file VSCloudService.exe is important.
Double click it to install. You will see this screen.
Note what all you get when you install. Click Next>.
Since you started with VS2010 which is still open it is complaining. I closed out of VS2010 at this point.
But still I did not go away. I just refreshed it couple of times and voila.
When it finally finished I am seeing this,

Well I am cooking now.
How to use Geography data type in SQL Server?
You can use geography data type in SQL Server but only if you use SQL Server 2008. Does not matter if it is SQL Express. It is not supported (yet, may be in SU3) in SQL Azure although SQL Azure is version 2008. But then it is only 10.25 and not 10.5.
You want a jump start follow this link:
http://hodentekmsss.blogspot.com/2010/06/using-spatial-data-types-in-sql-server.html
You want a jump start follow this link:
http://hodentekmsss.blogspot.com/2010/06/using-spatial-data-types-in-sql-server.html
Friday, May 14, 2010
How do I attach a database to a SQL Server?
Very simple.
You can do it in the SQL Server Management Studio (SSMS) or use System Stored Procedures.
You can see a step by step method at this link here.
http://hodentekmsss.blogspot.com/2010/05/using-sample-databases-with-sql-server.html
Moving from SQL Server 2000 to 2005 read here:
http://www.aspfree.com/c/a/MS-SQL-Server/Moving-Data-from-SQL-Server-2000-to-SQL-Server-2005/3/ [about 0.5 million page views]
Monday, May 10, 2010
Pure Microsoft SQL Servers
I have started a new blog exclusively covering topics that interested me (off /On) related to Microsoft SQL Servers. I also plan on posting links to my older articles on this subject.
I am a busy guy, you will also find new stuff that may help you in your learning experience.
Well, Hodentek is all about learning.
http://hodentekmsss.blogspot.com/
Welcome to the new blog.
Jay
I am a busy guy, you will also find new stuff that may help you in your learning experience.
Well, Hodentek is all about learning.
http://hodentekmsss.blogspot.com/
Welcome to the new blog.
Jay
Sunday, February 21, 2010
How do you telnet in Windows 7?
You must enable Telnet Client. If this is not in place you will not be able to telnet.
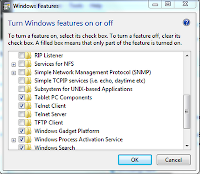
Go to Control Panel -->Programs -->Programs and Features -->Turn windows features on or off
This brings up the following window.

Place check mark for Telnet Client and click OK.
Now you can use the Telnet ccommand in the DOS window.
Subscribe to:
Comments (Atom)


