Monday, June 24, 2024

What is the latest version of Android Studio and how do you install it?

The latest version of Android Studio is called Koalas(2024.1.1)

Please visit this site for details: https://bit.ly/4eAwThe

For Windows download go here: https://bit.ly/3VToH4h

I had problems installing an older version named Arctic Fox here;

https://hodentekmobile.blogspot.com/2021/09/installing-android-studio-arctic-fox.html#google_vignette

Instructions:

If you downloaded an .exe file (recommended), double-click to launch it.

If you downloaded a .zip file:

Unpack the .zip.

Copy the android-studio folder into your Program Files folder.

Open the android-studio > bin folder.

Launch studio64.exe (for 64-bit machines) or studio.exe (for 32-bit machines).

Follow the Setup Wizard in Android Studio and install any recommended SDK packages.

Herein I describe the installation of Android Studio Koalas on a Windows x64 laptop Surface Pro 5. I downloaded this file:  android-studio-2024.1.1.11-windows.exe

The installation screens are shown here:


Although all the screens have successfully traversed, you do not see the Finish button enabled. The trick is go to each item in the list and accept the license terms. If all of them are accepted the Finish button gets enabled.


It will start downloading all the components and the program successfully ends.


This problem has been faced by any and even made it to the StackOverflow forum.


https://stackoverflow.com/questions/67062999/unable-to-install-the-sdk-tools-finish-button-is-disabled

Sunday, June 23, 2024

What is the latest version of Android Studio and what are its features?

 The latest version of Android Studio (2024.1.1) is called Koalas.

Android Studio is used for building high-quality, modern Android Applications. The following features make it extremely well suited for building modern Android applications. These are in no way new but essential in all modern design environments:

  •  Develop Native Android Apps:  The basic function is used to build Android applications using KOTLIN, or Java. KOTLIN is Google's preferred language for Android app development. It provides an development environment with all the necessary tools for writing, editing, testing, debugging, and deploying your application. It's Android device monitor can explore various aspects of a connected Android app.

  • Build app's UI with Jetpack Compose :  Without UI you can not think of an application and Android can do UIs. It uses 'Jetpack Compose' to create UIs. Jetpack Compose is a declarative UI framework that allows you to build modern, customizable, and efficient user interfaces with a more composable and reactive approach.

  •  Utilize Robust Development Tools: Android Studio has a rich set of tools to do almost anything such as:

  1.  Code editing: Syntax highlighting, code completion, refactoring tools, and code navigation for efficient coding.
  2.  Debugging: Step through your code, set breakpoints, inspect variables, and identify and fix bugs effectively. Debugging can also be used look at data flows in the app.
  3. Testing: Write unit tests, integration tests, and UI tests to ensure code quality and prevent regressions.
  • Emulation and Testing on Different Devices:  Every app developer wants to see how is app works on a physical device and the look and feel on other device sizes. Without needing a physical device for every configuration, you can use the built-in Android Emulator to test your app on virtual devices simulating various screen sizes, operating systems, and device capabilities. Additionally, you can connect real Android devices for testing and development. You can test on external devices using WiFi or USB. 
  • Integrate with Firebase and Other Services:  You can use Google Firebase for authentication, databases, cloud storage, analytics, and more. Android Studio also supports integrating with other third-party libraries and services to enhance app features such as Networking, Image loading, UI animations, databases, etc.

Here is a link to installing Android Studio on Windows 10: 

Also, couple of more articles on the same HodentekMobile blog.

Friday, June 21, 2024

Are there AI models that can help deal with diabetes?

There are pretrained AI models for diabetes.

GlucoNet Model: Deep learning model that can predict Glucose levels based on carbohydrate intake.

Deep Gluco Model: Not only takes carbo intake into consideration but also insulin dosage, physical activity, etc.

GlucoNet is adequate for diabetes type II. I will be homing in on type II.

These are used to improve the MIT control loop for adjusting optimal carbo intake.

There is company (Alertgy) in Melbourne, Australia involved in the development of diabetes monitored by a wearable device.

Right now, I have one with questionable activity, but qualitatively measuring (Zero, when not connected and 3 peaks to coincide in time with break fast, lunch and dinner).


Wednesday, June 19, 2024

How to discover Bluetooth connections with PowerShell?


About PowerShell:


Powershell is one of Microsoft's extremely useful and powerful tool. It is installed on most of the Microsoft computers and laptops.

Just open type in PowerShell in Windows Search as shown.

The Search brings up the following screen:

There are two versions of PowerShell for x86 and x64 architectures and there is also an Integrated Scripting Environment(ISE), a very useful option that can do a lot more than the command line tool.

I will be using this to discover Bluetooth devices on my laptop that are discoverable.

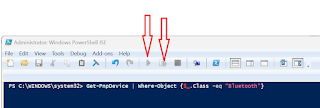
Let me open the x64 bit version with Administrator rights (also known as elevated permissions). I do this because, the program may not allow you to do certain things otherwise.


The red arrows are Running the code, or running a section of the code that you choose to run. Since, we are not using the ISE, these are greyed out.

Working with Bluetooth:

Bluetooth is a Pnp device and it is called Bluetooth. Run the following code as shown:


PS C:\WINDOWS\system32> Get-PnpDevice | Where-Object {$_.Class -eq "Bluetooth"}

After typing the code click Enter key. The following is displayed,

=====================

PS C:\WINDOWS\system32> Get-PnpDevice | Where-Object {$_.Class -eq "Bluetooth"}


Status     Class           FriendlyName                                                                     InstanceId     

------     -----           ------------                                                                     ----------     

OK         Bluetooth       Object Push Service                                                              BTHENUM\{000...

OK         Bluetooth       Bluetooth LE Generic Attribute Service                                           BTHLEDEVICE\...

OK         Bluetooth       Generic Attribute Profile                                                        BTHLEDEVICE\...

Unknown    Bluetooth       Jayaram's S23+ Avrcp Transport                                                   BTHENUM\{000...

OK         Bluetooth       Microsoft Bluetooth Enumerator                                                   BTH\MS_BTHBR...

OK         Bluetooth       Generic Access Profile                                                           BTHLEDEVICE\...

OK         Bluetooth       Intel(R) Wireless Bluetooth(R)                                                   USB\VID_8087...

OK         Bluetooth       Jayaram's S23+ Avrcp Transport                                                   BTHENUM\{000...

OK         Bluetooth       Microsoft Bluetooth LE Enumerator                                                BTH\MS_BTHLE...

OK         Bluetooth       Phonebook Access Pse Service                                                     BTHENUM\{000...

OK         Bluetooth       Personal Area Network Service                                                    BTHENUM\{000...

OK         Bluetooth       Bluetooth Device (RFCOMM Protocol TDI)                                           BTH\MS_RFCOM...

OK         Bluetooth       Jayaram's S23+                                                                   BTHLE\DEV_6A...

OK         Bluetooth       Jayaram's S23+                                                                   BTHENUM\DEV_...

OK         Bluetooth       Bluetooth LE Generic Attribute Service                                           BTHLEDEVICE\...

Unknown    Bluetooth       Jayaram's S23+ Avrcp Transport                                                   BTHENUM\{000...

OK         Bluetooth       Personal Area Network NAP Service                                                BTHENUM\{000...

OK         Bluetooth       Bluetooth LE Generic Attribute Service                                           BTHLEDEVICE\...

OK         Bluetooth       Jayaram's S23+ Avrcp Transport                                                   BTHENUM\{000...

===========================================

The InstanceID cannot be fully seen.

You need to format the output. The best way is to run the following:

PS C:\WINDOWS\system32>  Get-PnpDevice | Where-Object {$_.Class -eq "Bluetooth"} | Export-Csv -Path "C:\Users\Me\Desktop\listing.csv" -NoTypeInformation

This will provide a more complete output in the exported listing.csv file at the indicated location.

The CSV file has much more information in tabulated columns.


Although this gives some idea of connected devices, there are repetitions and somewhat difficult to look for specific information.

I not only want Bluetooth devices discovered but I would also like to get the ones that are ready for pairing with the laptop's Bluetooth.

This next code and the response makes it little more clear.

================================

PS C:\WINDOWS\system32> $devices = Get-ChildItem -Path HKLM:\\SYSTEM\\ControlSet001\\Services\\BTHPORT\\Parameters\\Devices

foreach ($device in $devices) {

    $address = $device.pschildname.ToUpper()

    $name = $device.GetValue("Name")

    if ($name -ne $null) {

        $printableName = ($name -notmatch 0 | ForEach-Object {[char]$_}) -join ""

        echo "Address: $address, Name: $printableName"

    }

}

Here is the response:

Address: 6A185BABF058, Name: Jayara's S3+

Address: 9C73B16CBD32, Name: Jayara's S3+

Address: FB621134FEF9, Name: KS01


PS C:\WINDOWS\system32> 

========================

In the above, I see my paired Samsung S23+ Smartphone and a Smartwatch, KS01. However, I do not see the paired Samsung Smart TV. That's something I need to troubleshoot.

In this post, discovering devices connected by Bluetooth was correctly identified using the PowerShell.


More on PowerShell here: Just search for PowerShell in this blog and You can get dozens of posts that deal with all aspects of Powershell.


Monday, June 17, 2024

Can you call Python libraries from Python Scratch files?

 I see no reason why Python libraries can not be called from Scratch files.  

Let me try using my existing Scratch.py (https://hodentekhelp.blogspot.com/2024/06/what-is-scratch-file-in-pycharm.html) to call the PIL library.


You see you can do it. 


However, you see an indent error. This is not a serious error. It just says there is an unexpected indent.  You can get rid of this error by moving the line "from PIL import Image" back one step, by removing the white space before "from".

This brings another weak warning (Yellow upright triangle with a ! inside). This is a weak warning and not an error. The call statement should be the first statement.

Now remove the print("Scratchy". This clears the weak warning.


Now that the calling of Image is successful, let us explore Image a little bit.

Using Image

The PyCharm provides a drop-down for facilitating code and you should watch out.

Let me see if I can Open an image on my desktop (C:\Users\hoden\OneDrive\Desktop\Beware.jpg).


To open an image you would use the open() method. You should use the image path as an argument in open().

The image we are using Beware.jpg is on the desktop and its location is

 "C:\Users\hoden\OneDrive\Desktop\Beware.jpg"


You get a bunch of errors for each "/" in the path. This needs to be corrected. The next image file specification removes the bunch of indent errors.


Each indent is replaced by // as shown above.

The code runs without errors. To see the image, we need to call another library. For now, since we have image, let me get the width and height of the image by the following code (you need not display the image to get its properties):

=========================================================

from PIL import Image

image_path = "C://Users//hoden//OneDrive//Desktop//Beware.jpg"

image=Image.open(image_path)

width, height = image.size

print(f"Image dimensions: Width = {width}, Height = {height}")

==========================================================

This code runs as well and you get the Height and width as,

Height= 259  Width=  259

The units are in pixels.

The height and width of the image from its properties using Windows explorer is shown here.


Important thing to note:

File references may sometime gets tricky as the file may be on the desktop, or some other location. It is best to catch an error, if the file is not at the expected location. 


Friday, June 14, 2024

Why would Elon Musk message me?

  Beware!


Dall-E3 created image

I recently received a private message from Elon Musk in my twitter (X) account. I confess, I felt good. However, I was skeptical because why would a multi-billionaire send a message. Has he no one else to correspond with?


Here are some screenshots on that day (about 2 days ago).


I humored him along to see where that would take me. Then he spoke about the enormous amount of money that he has made and going to make with a new Mining company of his. "Have you looked into investing in Bitcoin", etc. It did not smell good. I terminated the conversation.

It even got better. Then he sent a 0.06Sec voice mail. I ignored.

Today, another Musk (I don't know how many of them are walking around) became my follower and sent another message. This is getting comical and silly.

Well, I may not be the only person on the Internet who is subjected to this nonsense. Take care! I don't believe, he will be sending any message, especially now that he has to think about another $56 billion.

Monday, June 10, 2024

What is a scratch file in PyCharm?

 As the name implies it is a scratch file and not attached to any project. It is extremely useful to run some temporary stuff before you plan on using in a project. It is saved to a separate location and indexed. The code on the scratch can be run and debugged. What is more it is color coded.

How do you work with a scratch file?

It is very easy as shown in the PyCharm IDE. From the main menu you can access this dropdown when you click File.


When you choose New Scratch File or use the shortcut Ctrl+Alt+Shift+Insert the next dropdown is displayed. 

There are lots of programs you can run as shown. These are all functional and bring in great value to the IDE.

Herein, for demo I shall create a python file and test run it. When I choose a Python code, it creates a file scratch.py and saves it to the Scratches directory. I write this simple code in the scratch.py file,

print("Scratchy") as shown.


Now you can run this file and the interpreter picks it up. After highlighting the scratch.py file in the Scratches folder, with a right click you display this dropdown.


In the drop-down, you click Run 'Scratch'. The code gets run and you see the result of running the code.
You can rerun the code using the control shown with the horizontal arrow insert. There is a main run control in the main menu and it will not run the code in Scratch folder.


You can rename the file. You need to choose the file and right click. From the drop-down click Refactor and rename the file.

In addition to fully functional files show above, you can also use the Scratch Buffers. These can not be run as they are just text files. You need to create a scratch buffer to store these(also indexed and rotated). It is an excellent feature to keep codes, code scratches, and anything else you want to come back to.

How to create a Scratch buffer file?

Ctrl+Shift+A brings up a window. In the window start type in "New Scratch.." and you get some choices. Choose New Scratch Buffer and a buffer1.txt is created wherein you can keep your notes. These files are also stored in the Scratches node.


Saturday, June 8, 2024

How do you install Python Image Library for PyCharm?

 PIL, or Python Image Library provides support for working with images in Python (Interpreter). PIL provides a fairly fast and powerful way to process images.

You may also come across Pillow. Pillow (a fork of PIL) is same as PIL, and it was created since PIL was not supported since 2009.You use Pillow wherever you need PIL. Pillow is supported by active developers.

Importantly Pillow provides,

File format support.

Image processing capabilities.

In an earlier post we have seen many of the desirable features of PyCharm. Other libraries for processing images in Python are OpenCV and matplotlib.

PIL Installation:

Using PIP, PIL can be installed. Installing Pillow (or PIL) is easy and with a simple command,

pip install Pillow

However, you may have to use it with caution.

PIL,  or Pillow with PyCharm:

If you have PyCharm installed, it is fairly easy to install PIL. The highligted in blue is the node for Phyton Packages.


You find Pillow at the end of the listt of packages available in this node.


If you click Install (blue lin) it opens a drop-down list as shown.


From PIL 1.0 to 10.3.0 versions can be installed. What is the best version then? It would be the latest since Pillow is maintained with all bug fixes. If you need to work with older projects you may need to dig a little deeper as there may be compatibility issues with Python versions.

Herein the latest version will be used and if some problems arise other versions may be considered.

Clicking on 10.3.0 installs this version of Pillow. Easy, isn't it?


How do you check if Pillow is installed?

Just try to run the following code from the Python Console shown in blue, 

from PIl import Image

You should see the success of your code.

Visit again for more PyCharm and PIL.