Tuesday, July 31, 2018

Why are the C# templates missing in Visual Studio Community 2017? - Part 2

Visual Studio's combo program Blend 2017 seems to have the C# templates missing in Visual Studio Community 2017, Version 15.7.5.

Here is a New Project window open in Blend 2017. There are C# Windows Universal Project templates.


It allows you create a new project, a UWP, C# Blank Project as shown but with errors.


For the above these (default) were chosen.


The design area of XAML displays System.Exception but the project builds alright.


It fails to deploy and this is the error message:

The package deployment operation is blocked by the "Allow deployment operations in special profiles" policy.
   at Microsoft.VisualStudio.DesignTools.UwpDesignerHost.UwpHostPlatform.<>c__DisplayClass31_0.b__0()
   at System.Threading.Tasks.Task.InnerInvoke()
   at System.Threading.Tasks.Task.Execute()
--- End of stack trace from previous location where exception was thrown ---
   at System.Runtime.CompilerServices.TaskAwaiter.ThrowForNonSuccess(Task task)
   at System.Runtime.CompilerServices.TaskAwaiter.HandleNonSuccessAndDebuggerNotification(Task task)
   at Microsoft.VisualStudio.DesignTools.DesignerHost.HostServices.HostPlatformBase.d__20.MoveNext()
--- End of stack trace from previous location where exception was thrown ---
   at System.Runtime.CompilerServices.TaskAwaiter.ThrowForNonSuccess(Task task)
   at System.Runtime.CompilerServices.TaskAwaiter.HandleNonSuccessAndDebuggerNotification(Task task)
   at Microsoft.VisualStudio.DesignTools.SurfaceDesigner.Documents.SurfaceIsolation.SurfaceProcessContext.d__82.MoveNext()
--- End of stack trace from previous location where exception was thrown ---
   at System.Runtime.CompilerServices.TaskAwaiter.ThrowForNonSuccess(Task task)
   at System.Runtime.CompilerServices.TaskAwaiter.HandleNonSuccessAndDebuggerNotification(Task task)
   at Microsoft.VisualStudio.DesignTools.SurfaceDesigner.Documents.SurfaceIsolation.SurfaceProcessContext.d__81.MoveNext()
--- End of stack trace from previous location where exception was thrown ---
   at Microsoft.VisualStudio.DesignTools.SurfaceDesigner.Documents.SurfaceIsolation.SurfaceProcessContext.d__81.MoveNext()
--- End of stack trace from previous location where exception was thrown ---
   at System.Runtime.CompilerServices.TaskAwaiter.ThrowForNonSuccess(Task task)
   at System.Runtime.CompilerServices.TaskAwaiter.HandleNonSuccessAndDebuggerNotification(Task task)
   at Microsoft.VisualStudio.DesignTools.XamlSurfaceDesigner.Views.IsolatedSurfaceImageHost.d__87.MoveNext()
--- End of stack trace from previous location where exception was thrown ---
   at Microsoft.VisualStudio.Telemetry.WindowsErrorReporting.WatsonReport.GetClrWatsonExceptionInfo(Exception exceptionObject)

System.AggregateException
One or more errors occur
------------------------------------
Deployment error, severity code are as shown.
Severity Code Description Project File Line Suppression State
Error DEP0800: The required framework "C:\Program Files (x86)\Microsoft SDKs\Windows Kits\10\ExtensionSDKs\Microsoft.NET.CoreRuntime\1.1\.\AppX\x64\Microsoft.NET.CoreRuntime.1.1.appx" failed to install. [0x80073D01] The package deployment operation is blocked by the "Allow deployment operations in special profiles" policy. ProjwithBlend
The files shown here do exist :
Microsoft.NET.CoreRuntime.1.1.appx


Monday, July 30, 2018

How to add a SLICER to my report in Power BI?

SLICER control provides filtering capability to the report, both Basic and Advanced.

Here is a clustered column chart from one of my previous posts.
The data of Male/Female/Total populations for several states in India is shown.


This uses a Clustered Column chart shown.


The next image shows the data behind the above report.


Only very few of the Indian States haven been chosen for the report and if you had had all of the States in this view it will be more crowded. Now how do I just filter a State from this report. You can do this by adding a SLICER (shown in the next image and you find thiss under VISUALIZATIONS).


You click and add the SLICER. The SLICER gets added to the report as shown. Here is a List of all STATES in the report. Instead of a List , you could also opt for a Drop-down list.


Now using the Basic filtering you can manipulate the report to show the one for the STATE you choose in the LIST as shown (Herein PUNJAB is chosen).


In addition to Basic you also have Advanced filtering where you can impose further conditions on your choice for the states.

Using the condition that the STATE name starts with 'C', the number of States is reduced. Now you can choose from this reduced LIST.


Sunday, July 29, 2018

How do I create a Combo chart in Power BI?

Combo charts or charts of type in VISUALIZATIONS which share the same x-Axis.  First of all you need to choose the type of chart that you want to create.

Here is a clustered column chart from one of my previous posts.


ComboChart_0

This shows a chart of male, female and total populations in four of Indian States, Andhra Pradesh, Tamil Nadu, Karnataka and Kerala (all South Indian states).

Now I change this chart type to Line and Clustered Column Chart. The chart will not change.


ComboChart_1

Now go back to the Fields tab under VISUALIZATIONS as shown here.


ComboChart_2

Now drag one of the fields (Female in this case) under FIELDS to the space under Line Values under the VISUALIZATIONS|Fields as indicated in the next image.

ComboChart_3

Now the Chart appears as shown, you see the Line chart superimposed on the Column chart.


ComboChart_4

Now go back to Format under VISUALIZATIONS and expand Shapes as shown here.


ComboChart_5

Here, you can turn-off the shaded area under the line graph. You can choose several other visual items a shown here.


ComboChart_6

You can also have a combo chart using the Line and Stacked Column chart as shown here:


ComboChart_7


Friday, July 27, 2018

Why are the C# templates missing in Visual studio Community 2017?

Recently installed Visual Studio Community 2017 with the following details:

Microsoft Visual Studio Community 2017 
Version 15.7.5
VisualStudio.15.Release/15.7.5+27703.2042
Microsoft .NET Framework
Version 4.7.03062 

I tried to run a previously well designed project by loading the project and failed. I noticed a number of errors such as these:

The UI elements can still be seen in the XAML view in the MainPage.xaml and the same elements in the MainPage.xaml.cs are getting to be unrecognized by red wiggly (does not exist in the current context). some fifty errors CS0103 error

Also the CS1061 error that the MainPage does not contain a definition for 'initialize Component' accepting first argument of type 'MainPage' could be found.

I could not fathom the reason and spent about 6 hours.

Then I resorted to recreate the app from scratch by creating a new C# project and noticed that the C# language related templates were missing. I am not sue if my errors are related to the missing templates!


I tried to reinstall Visual Studio from within the IDE, but I had really installed all the necessary items.


I believe the Visual Studio 15.7.5 I installed does not have the templates.

Blend 2017 has the templates but they cannot be used.

http://hodentekhelp.blogspot.com/2018/07/why-are-c-templates-missing-in-visual_31.html

Microsoft Emulator problem in Visual Studio Community 2017 to Version 15.7.5

I upgraded the Visual Studio Community 2017 to Version 15.7.5 and now the emulator seems to have problems. The Hyper-V Manager shows the emulator is working but it is not recognized in Visual Studio IDE. Visual Studio, Microsoft Edge and Hyper-V are the only active screens.


Here is the Hyper-V Manager screen:


There is a link in the Windows Phone message that takes you no where.

Thursday, July 26, 2018

How do you animate 3D - Models in Power Point?


I have a subscription for Microsoft Office 365 products and presently I have the Version 1806 (Build 10228.20134 Click-to-run).

With this launched, I can see under the Insert | Illustrations group 3D Models. After you insert the model you can highlight it and click the Animations Menu item which brings up the  3-D animation related  'ribbon' displaying the various effects possible.

You can create your own 3D-Model using the Paint 3D program on most Windows 10 computers; or use models created by others in the Gallery which is accessible from Paint 3D.

You can then animate the models and even add regular animation as well.

Here is an example of 3D animations on Your tube:


Tuesday, July 24, 2018

How do you handle the message, Project with an Output Class Library cannot be started directly?

This is a typical message that you get from Visual Studio when you try to debug a project of type Class Library. The project produces a Class.

In order to get around this error, you should create another project, can be in the same Solution which can be executed. In this executable project you should reference the Class Library project. Also, you should designate the executable project as the Start Up Project.

Here is a typical class library project that depends on the .NET Framework.

ClassLibFrame_1.png

This project can be built, but when you try to Start this project without debugging you will get the Visual Studio message.


You can get around this and run provided you add another executable project shown here to the Solution:


OutputTypeCannotbeStarted_1

The Main() program of the project FindJoin is shown here:


OutputTypeCannotbeStarted_2


Also you need to mark FindJoin as the Start up project from Solution Explorer.


OutputTypeCannotbeStarted_3

With this accomplished you can do a Ctrl+F5 to Start without debugging and you should see the response as shown:


Monday, July 23, 2018

Can I run a Class Library project in an interactive session?

A Class Library project creates a class file, a .dll. You cannot run it directly because there is no executable, lacks a Main() program.

However, you can run it in an interactive session by following the next mentioned steps:

Right click the Class Library Project and choose Initialize Interactive from the drop-down list:


ClassLibFrameInteractive_0

The C# Interactive session begins with loading the project context related files as shown.


ClassLibFrameInteractive_00

Now that Joinstring namespace creates a class, Create an instance of the class as cls1.

cls1 can now access the Add method in Class1 which takes two arguments.
Supply them and print the result as shown.


ClassLibFrameInteractive
-------------
Here is the Joinstring project folder and Class1.cs


ClassLibFrameInteractive_000


ClassLibFrameInteractive_001

Sunday, July 22, 2018

How do you create a Class Library .NET Framework project?

When you choose C#'s Class Library (Framework) Project in Visual Studio, this is what you will be creating. The image shows the folder structure in the Solution Explorer and the .cs file created.


ClassLibFrame_0

It basically provides a template for creating a Class file, Class1.cs that uses the references appropriate for using the Framework library using Microsoft.CSharp.

You can write code appropriate to do something for this Class. 

For example, you may provide two string variables to the class to generate a concatenated string (using the + operator). The name you give to the project, is its namespace.

The following Class1.cs is what you need to concatenate two strings.


ClassLibFrame_1.png

The important step is to write the correct code that will be accepted by the build process.
When you build this project, this is what you should see:


ClassLibFrame_2.png

This class returns a value which cannot be executed directly. If you try to debug this project you will get this message.


Saturday, July 21, 2018

What are class library projects in Visual Studio 2017?

In Visual Studio Community 2017 you come across a number of templates of type, class library as shown here only for C# and F#.


ClassLibraryCom2017_0

Well, is there a need for so many of them? Visual Studio 2017 is targeting many more platforms and it is nice to have templates for each of them. Actually templates are the best starting points for any development.

The project folder and the code for the Class Library .NET Core is shown here. It can be used for projects for several platforms where .NET core is supported. Review the dependencies.


The project folder and the code for the Class Library .NET Standard is shown here. The dependency is on .NET Standard Library.


The project folder and the code for the Class Library .NET Framework is shown here. You create .dll with this template.


With the development of projects for the Universal Windows Platform, a class library project that targets UWP is also available in Visual Studio Community 2017 (free).

However there is one detail that needs to be taken into consideration as to which version of Windows platform should be used.

In this present case the following version is chosen.


The template folder and code for the Class Library for creating applications for UWP is as shown. Note the reference to the Microsoft.NETCore.UniversalWindowsPlatform


In addition to the above there are many more template types summarized here for other specific platforms:

Class Library (Android) Creates Xamarin.Android class library

Bindings Library(Android) Xamarin.Android class library that binds to Java jar.

Class Library (watchOS) Xamarin.WatchOS library 

Class Library (tvOS)  Unified library project for tvOS

Class Library (iOS) creates a Xamarin.iOS library project for iOS

Class Library(U-SQL Application) is of type Azure Data Lake, a project for creating class library(.dll) that can run on U-SQL.

Class Library(Legacy Portable) is discontinued. It is suggested to use Class Library .NET Standard.


Friday, July 20, 2018

How do you run a C# Console Application using PowerShell?

How do you run C# Console Application using PowerShell?

Microsoft.PowerShell.Utility module has a cmdlet, Add-Type. Add-Type can be used to execute the code from PowerShell command shell.

The Add-Type has a large number of parameters and using these Add-Type will define and generate the class. If you specify source code, Add-Type compiles the source code and generates an in-memory assembly that contains the .NET Framework types.

Here are some of the parameters of Add-Type from Microsoft documentation here.

Add-Type
   [-CodeDomProvider ]
   [-CompilerParameters ]
   [-TypeDefinition]
   [-Language ]
   [-ReferencedAssemblies ]
   [-OutputAssembly ]
   [-OutputType ]
   [-PassThru]
   [-IgnoreWarnings]
   []


Here is an example of using the source code in a here-string.


Now we use this string in TypeDefinition that takes a String as follows:

Add-Type -TypeDefinition $Source

Now the code is executed using the following:

[Joinstring]::Add("Jay"," Krishnaswamy"

Here is the code in Windows PowerShell ISE.


What is the difference between a C# Console application that uses .NET core and the other using .NET Framework?

Both of them create programs that can be run from command line.

While you can create both types using templates available in Visual Studio Community 2017 shown, there are many differences.


ConsoleCore-Frame_0

One major difference is that .NET Core application can be used for creating cross-platform (Windows, Linux and macOS) applications while .NET Framework is for those dependent on .NET Framework libraries, or those that do not have similar functionality in .NET Core.

Also there may be platforms that do not support .NET Core in which case you have to use .NET Framework.

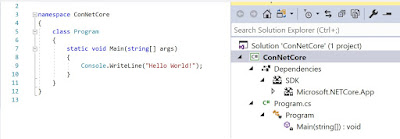
Here is the template for a console application that uses .NET Core (both program folder and code)


ConsoleCore-Frame_1

The Microsoft.NETCore.App is a huge library

Here is the code for the console application that uses .NET Framework.

ConsoleCore-Frame_2