Friday, October 24, 2014

How to developer-unlock a Windows Phone 8.1 Preview and deploy an app?

You are a Windows Phone 8.1 Preview developer and you have created a nice app that you want to
test on a phone you own.

How do  you test it?

While developing the application using Visual Studio 2013 Express for Windows Update 3 (this is a
free developer resource, read more here) you will see it on a emulator, the phone image that emulates your actual phone  that comes on your PC/Laptop when you run the app. After running the app on your laptop you should deploy it to your phone. The phone you buy is by default locked and you need to unlock it.

Details of unlocking the phone are here:
Go to this link:
http://go.microsoft.com/fwlink?LinkID=317976

This is how I was able to do.
  • I connected my phone (Nokia Icon) to the laptop.
  • On my Windows 8.1 Professional (x64 bit) laptop I searched for Windows Phone and got these results(few shown)


  • I clicked on the Windows Phone Developer Registration. I do have a developer license attached to my Windows LiveID (you shold have one too).

The following screen opened up. Notice the last line in this screen referring to the status. The phone I am using is identified.


I clicked on Register

The phone gets registered and the status shows it is unlocked now.


I can now deploy the app to the device. If deployment is successful I will be able to see the app on my app list in the phone.

I have to take care of the following before I deploy.
Make sure the phone is connected to the PC/laptop on which you developed the application.
Build the app for ARM architecture (you should find it immediately below the menu item Store on your Visual Studio 2013 IDE, see next image) and make sure the phone is working and is not locked.


Thursday, October 23, 2014

How do I take a screenshot of a display on my Windows Phone 8.1?

This is easy but a little tricky but you do get a signal when you capture an image.
I am using Nokia Icon using Windows Phone 8.1 Preview.

Also you may not have a folder called Screenshots in your Photo where it is supposed to get saved. But as soon as you add your first screen shot, a folder Screenshots will be created where your first screen shot is stored. You do not need an app to do this.

How do you capture?

With the display showing your image, hold and press both Volume Up(hardware) and Start (hardware) buttons together. This is the tricky part because the Start (hardware start) button when pressed turns your display dark and I could do it only 30% of the times. But it does work.

Here is a screenshot I took today:
http://hodentekmobile.blogspot.com/2014/10/how-do-i-get-health-and-wellness-app-to.html


Wednesday, October 22, 2014

What is LumiaSensorCore?

Microsoft introduced Lumia SensorCoreSDK at Build 2014. It enables memory-efficent tracking of motion and location information. It is ideally suited to building health and fitness tracking activities using the 4 apis.

It is supported on several of Nokia phones using Windows Phone 8.1 OS. The early beta is now an offial release SDK version 1.0 since Octobe 14.

If you are a developer you should access this site to learn more:
http://developer.nokia.com/lumia/nokia-apis/sensorcore
It is already built into Bing app for Health and Fitness app from Windows Store.
http://www.bing.com/explore/binghealthfitness


Friday, October 17, 2014

What is DISM (Deployment Image Servicing and Management)?

DISM is short for Deployment Image Servicing and Management. It can be used in new deployments as well as repairing the local image (the OS on the laptop or desktop). It is a very useful tool to know.

It works on many Windows platforms:
  • Windows 8
  • Windows 81
  • Windows Server 2012
  • Windows Server 2012 R2
  • Windows 7
  • Windows Server 2008 R2
Also review this link for Windows 7 related information:


Good news is it is installed with Windows 8.1 and is found here typically:
C:\windows\System32

If you search for it you may find it in several folders.
These are listed in my Windows 8.1 Professional (x64).


How do you use it?
It is a command line tool and you need to bring up command processor with administrative privileges
(Run As Administrator) also know as elevated mode. If you are unable to run cmd.exe in elevated mode like it happenned to me follow this link for the procedure to run in elevated mode.
http://hodentekhelp.blogspot.com/2014/10/how-to-run-command-processor-in.html
Now type dism /? after the C:\ prompt. You get the help file as shown and you get to display the file
details and its usage.
--------------------
Microsoft Windows [Version 6.3.9600]
(c) 2013 Microsoft Corporation. All rights reserved.

C:\Windows\system32>dism /?
Deployment Image Servicing and Management tool
Version: 6.3.9600.17031


DISM.exe [dism_options] {Imaging_command} []
DISM.exe {/Image: | /Online} [dism_options]
         {servicing_command} []

DESCRIPTION:
  DISM enumerates, installs, uninstalls, configures, and updates features
  and packages in Windows images. The commands that are available depend
  on the image being serviced and whether the image is offline or running.

GENERIC IMAGING COMMANDS:
  /Get-MountedImageInfo   - Displays information about mounted WIM and VHD
                            images.
  /Get-ImageInfo          - Displays information about images in a WIM or VHD
                            file.
  /Commit-Image           - Saves changes to a mounted WIM or VHD image.
  /Unmount-Image          - Unmounts a mounted WIM or VHD image.
  /Mount-Image            - Mounts an image from a WIM or VHD file.
  /Remount-Image          - Recovers an orphaned image mount directory.
  /Cleanup-Mountpoints    - Deletes resources associated with corrupted
                            mounted images.
WIM COMMANDS:

  /Capture-CustomImage    - Captures customizations into a delta WIM file on a
                            WIMBoot system. Captured directories include all
                            subfolders and data.
  /Get-WIMBootEntry       - Displays WIMBoot configuration entries for the speci
fied disk volume.
  /Update-WIMBootEntry    - Updates WIMBoot configuration entry for the specifie
d disk volume.
  /List-Image             - Displays a list of the files and folders in a
                            specified image.
  /Delete-Image           - Deletes the specified volume image from a WIM file
                            that has multiple volume images.
  /Split-Image            - Splits an existing .wim file into multiple
                            read-only split WIM (SWM) files.
  /Export-Image           - Exports a copy of the specified image to another
                            file.
  /Append-Image           - Adds another image to a WIM file.
  /Capture-Image          - Captures an image of a drive into a new WIM file.
                            Captured directories include all subfolders and
                            data.
  /Apply-Image            - Applies an image.
  /Get-MountedWimInfo     - Displays information about mounted WIM images.
  /Get-WimInfo            - Displays information about images in a WIM file.
  /Commit-Wim             - Saves changes to a mounted WIM image.
  /Unmount-Wim            - Unmounts a mounted WIM image.
  /Mount-Wim              - Mounts an image from a WIM file.
  /Remount-Wim            - Recovers an orphaned WIM mount directory.
  /Cleanup-Wim            - Deletes resources associated with mounted WIM
                            images that are corrupted.

IMAGE SPECIFICATIONS:
  /Online                 - Targets the running operating system.
  /Image                  - Specifies the path to the root directory of an
                            offline Windows image.

DISM OPTIONS:
  /English                - Displays command line output in English.
  /Format                 - Specifies the report output format.
  /WinDir                 - Specifies the path to the Windows directory.
  /SysDriveDir            - Specifies the path to the system-loader file named
                            BootMgr.
  /LogPath                - Specifies the logfile path.
  /LogLevel               - Specifies the output level shown in the log (1-4).
  /NoRestart              - Suppresses automatic reboots and reboot prompts.
  /Quiet                  - Suppresses all output except for error messages.
  /ScratchDir             - Specifies the path to a scratch directory.

For more information about these DISM options and their arguments, specify an
option immediately before /?.

  Examples:
    DISM.exe /Mount-Wim /?
    DISM.exe /ScratchDir /?
    DISM.exe /Image:C:\test\offline /?
    DISM.exe /Online /?
C:\Windows\system32>

-------------
You can get more information as shown in the examples above.

If some of your files are corrupted and causing problems you can use this tool to see which of them are corrupted and also heal them using uncorrupted versions.


How to run command processor in elevated mode?


Normally it should be very easy. Search for cmd in the search charm. In the drop-down menu right click 'Command Prompt' and from the drop-down menu click 'Run as administrator'.

If that does not start cmd.exe in elevated mode you may follow the next procedure. Due to some bugs the elevated mode does not start this way.
Click Cntrl+Alt+Del to bring up the Task Manager screen as shown:


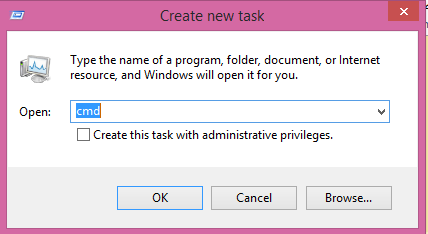
Click File | Run new Task (by default the cmd is chosen)
The Create new task window is displayed with cmd as the task as shown.


Place check mark for 'Create this task with administrtive privileges'
The command processor in the elevated mode is displayed. Now you can carry out all thingss that need elevated mode.

Wednesday, October 15, 2014

How do you create a compressed file in Windows 8.1?

Normally (as in Windows 7 or Windows XP) it should be real easy requring just a right click on the file you want to save as a compressed file.

It is (sometimes) not that easy in Windows 8.1. The reason being the right click produces a dud if there is something wrong. Did I say a bug? or corrupted file? Nothing happens, as in my case. The CMD.exe cannot be run in adminstrative mode since the same thing happens as a with a right click.

What do you do now?

As any sane person would do, trash your laptop/desktop/tablet/phone/xxx or Microsoft. I am kidding.

The solution I found is the following:
You need to read the next two posts to prepare yourself:
http://hodentekhelp.blogspot.com/2014/10/how-do-you-open-file-explorer-in.html
http://hodentekhelp.blogspot.com/2014/10/how-do-you-access-folderfile-properties.html

Having read the above open you folder which contains the file or folder you want to compress as shown:
Now you can see you can create a zip file. Click on New Item to create a zip file.


Tuesday, October 14, 2014

How do you open File Explorer in Windows 8.1?

In Windows 8.1 (Professional in this case but should be the same in other versions) what used to be Start in Windows 7 has been replaced by the Windows logo which takes you to the Metro mode of Windows 8.1.

If you right click the logo you bring up a pop-up menu as shown.


If you click the File Explorer (no matter click, right click or left click), nothing happens, the desktop display is refreshed.

How do you open the File Explorer?

Open the Search charm and type in File Explorer. The File Explorer appears in the Search as shown.


Right click the File Explorer click Pin to Taskbar in the pop-menu shown here.


Now a folder icon is added to the Taskbar as shown.


Now right click the folder icon (File Explorer) to display the pop-up menu from which you can access the folders.

A related question is in the following link:
http://hodentekhelp.blogspot.com/2014/10/how-do-you-access-folderfile-properties.html


What is SQL Server PowerShell provider and how do you use it?

SQL Server PowerShell provider enables you easily and interactively look at all objects much like you look at all the objects in a folder/file system.  You can use the command line to traverse paths in a SQL Server.

The server objects available as folders when you use Windows Power Shell are:
SQL
SQL Policy
SQL Registration
Utility
DAC
Data Collection
SQL Server Integration Services
SQL Server Analysis Services


In order to acces objects on SQL Server you need to run SQLPS.exe which you find in the following directory:
---------------------------------------------
C:\Program Files (x86)\Microsoft SQL Server\110\Tools\PowerShell\Modules>dir
 Volume in drive C is TI10672700E
 Volume Serial Number is 16FB-D230

 Directory of C:\Program Files (x86)\Microsoft SQL Server\110\Tools\PowerShell\M
odules

 
07/06/2014  06:33 PM              .
07/06/2014  06:33 PM              ..
07/06/2014  06:37 PM              SQLASCMDLETS
07/06/2014  06:40 PM              SQLPS
               0 File(s)              0 bytes
               4 Dir(s)  880,764,026,880 bytes free

----------------------
When you run SQLPS by double-clicking the file you spawn a new scripting shell 

------------
Microsoft SQL Server PowerShell
Version 11.0.2100.60
Microsoft Corp. All rights reserved.

which you can use with SQL Server as shown:
PS SQLSERVER:\>
--------------
In this shell you can access the previously mentioned SQL Objects much like you would acces folders/files using you DOS commands as shown here.
---------------
PS SQLSERVER:\> cd SQL
PS SQLSERVER:\SQL> cd..
PS SQLSERVER:\> cd SQLPolicy
PS SQLSERVER:\SQLPolicy> cd..
PS SQLSERVER:\> cd SQLRegistration
PS SQLSERVER:\SQLRegistration> cd..
PS SQLSERVER:\> cd Utility


How do we access the Server databases?
In order to do this you have to know the SQL Server Instance(s) and then the objects can be accessed as shown here:
-------
Get the instance name:
--------------------------
PS SQLSERVER:\> cd SQL
PS SQLSERVER:\SQL> dir

MachineName
-----------
HODENTEK8
localhost


PS SQLSERVER:\SQL> cd LocalHost
PS SQLSERVER:\SQL\LocalHost> dir
Instance Name
-------------
REGENCYPARK
------------------------------
Let us say we want all the objects on the AdventureWorks 2012 database on this instance.
You can find them as shown here:
--------------
PS SQLSERVER:\SQL\LocalHost\RegencyPark\Databases\AdventureWorks2012>
ApplicationRoles
Assemblies
AsymmetricKeys
Certificates
DatabaseAuditSpecifications
Defaults
ExtendedProperties
ExtendedStoredProcedures
Federations
FileGroups
FullTextCatalogs
FullTextStopLists
LogFiles
PartitionFunctions
PartitionSchemes
PlanGuides
Roles
Rules
Schemas
SearchPropertyLists
Sequences
ServiceBroker
StoredProcedures
SymmetricKeys
Synonyms
Tables
Triggers
UserDefinedAggregates
UserDefinedDataTypes
UserDefinedFunctions
UserDefinedTableTypes
UserDefinedTypes
Users
Views
XmlSchemaCollections

That's all for now.

Mahalo

Accessing PowerShell in SSMS go here:
http://hodentekmsss.blogspot.com/2014/04/starting-power-shell-from-sql-server.html

How do you access folder / file properties in Windows 8.1?

In earlier versions of Windows you would right click a file or a folder to access the properties via the drop-down menu.

But in Windows 8.1 (in my case Windows 8.1 Professional 64bit), a right click would just refresh the Windows Desktop and nothing happens). I believe this is not how it should be and here is a way to look at the folder / file properties.

In Windows 8.1 open the File Explorer as shown.


Click open the folder for which you want to review the properties. In this case Desktop for example.
The Window for Desktop opens with its own ribbon as shown.


Choose the folder or file (mysorian in this case) and access its properties via the Properties toolbar item.

It was so easy in earlier versions. I wish the earlier way of access is restored.