Showing posts with label Visual Studio 2017 Community. Show all posts

Sunday, May 6, 2018

What is local scope in C++ and how do you visualize?

In a C++ function, the variables defined in the function have local scope. They exist as long as they are inside the function and once outside the function they are no longer available. They are initiated when they are defined and go out of scope or destroyed as soon as the function has finished its task.

How do you see this in an actual example. If you run the example, the processing is fast and you do not see the individual steps as to when the variables get defined, when they get initialized and when they  go out of scope.

Here a step-by-step process of debugging is described using Visual Studio 2017 Community as in the earlier post.

Let us take this example from an earlier post:
---------------------------
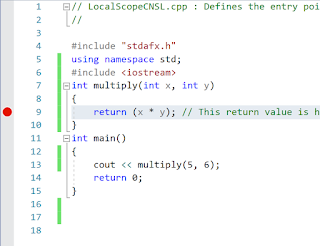
// LocalScopeCNSL.cpp : Defines the entry point for the console application.
//
#include "stdafx.h"
using namespace std;
#include
int multiply(int x, int y)
{
 return (x * y); // This return value is held in an anonymous object
}
int main()
{
 cout << multiply(5, 6);
    return 0;
}

-------------
Integer variables x and y are defined as parameters of the function multiply() and therefore they come into existence where they are initially defined. Their return value exists in the main() function and as soon as main() is finished, x and y go out of scope.


Highlight the line:
return (x*y)

Click Debug to open the following:


Debug_0

Pick Toggle Breakpoint and this puts a red dot to the left of the line you highlighted as shown.


With this we arranged to stop the execution at this point and the program will stop here as it begins to execute.
Now go back to Debug and from the menu choose Start Debugging (alternately you can hit F5).
You may get a message like this.

Debug_3

Click Yes.

The program starts executing. You will see the Console comming up and the execution stops at the line you highlighted return(x*y) as shown here:

Debug_4

If you hover your pointed over x or y, you will see that they are defined here.


Debug_5

Now go back to Debug and from the menu click Step Into.


Debug_6

The excution goes forward one step as shown. We will be doing this again and again till the program finishes.
Now hover over cout as shown


Debug_7

Do one more time, Step Into.
The program takes you to where x and y are defined, that is, inside the function multiply().


Debug_8

Take one step forward using Step Into

The program goes to the next step return(x*y) and now x value which was defined is now initiated to 5 as shown. Similarly y is initiated to 6.


Debug_9

Take one more step and you will see that the program has now entered the main() function.


Debug_10
Now move forward one more step and it is now on the line cout. But so far nothing on the Console as shown here:


Debug_11

Step into one more time and the program return to a point just going out of multiply() as shown.

Debug_12

Step Into one more time, the program is in main() again.
The program moves to return 0; and the Console has the value in cout, namely 30 as shown.

Debug_14

If you hover over the variables you will not see their values.

Step Into one more time.
The program is on the verge of finishing as shown.


Debug_15

One more step into and the user program has finished but the processing is not complete and these are being executed as shown:


Hit Continue in the toolbar.


Debug_17

The console closes and the program returns to its original state as shown.


Debug_18

The Program now goes through finishing other details which are internal to the program, part of one step shown here.


You can click on the red dot to remove the toggle point.

Monday, April 9, 2018

How do you work with an anonymous function in C++?

Let us take the example of multiplication of two integers, the resulting value is
also an integer. Now we can return the value after multiplication into a multiply function using an anonymous object that holds the value after multiplication.

In Visual Studio 1027 Community you would start a Windows Console Application as described in a previous post.

This is a C++ Windows Console Application created using VS 21107 Community. The name of the function is AnonFn and the AnonFn.cpp file is reproduced here:

--------------
// AnonFn.cpp : Defines the entry point for the console application.
//
#include "stdafx.h"
using namespace std;
#include

int multiply(int x, int y)
{
 return (x * y); // This return value is held in an anonymous object
}
int main()
{
   cout << multiply(8, 7);
 return 0;
}

After Building this use Ctrl+F5 to run the program and you should see the console. Make sure if you make changes to the program that you build again and this message may show up, if you have not built the program.


Now after building the project click Ctrl+F5 to execute the program. This is what you will see in the DOS screen that gets displayed.


What if you try to multiple 8 and 7.8? the result will still be 56.

Sunday, April 8, 2018

Is there a fix for the C++ Console Application template loading error?

In a previous post I described an error wherein the C++ Windows Console Application failed to load.

 Visual Studio Community 2017 also failed to open a previous C++ Windows Console Application project (created two days earlier). There was no problem with C# programs.

Well, the reason could be the Windows 10 OS Update on 4/4/2018.  I believe some of the other people also place the blame on the Update.

There were two suggestions from the Microsoft MSDN forum, one of which suggested upgrading to a recent version and the other to repair the present installation.

I decided to try yet another way, to modify by removing DESKTOP Development with C++ related items and then , add the Desktop items after verifying whether the Modification did anything at all to the VS Community 2017.

To my surprise, although I removed the desktop item in the installer screen, I could still create a C++ Windows Console application without getting the previously documented error.

Am I happy, yes I can proceed with what I want to do. But I am a bit disheartned that the removal did not remove the items from the New Project window after modification.

Here are the installer options:


The check box for DeskTop Development with C++ (about 512MB) was unchecked and the Modify button was clicked.

You need to close any running programs:


You may need to close running programs.


After modification, the VS 2017 Community  is launched.

I was expecting not to find Windows Console Application under C++ templates, but I was surprise to find that the template was still available.


Just to be sure, I invoked the installer one more time and tried the modify option. I found that the Desktop Development with C++ was unchecked.


Can you place a ScrollViewer inside another ScrollViewer in a UWP project?

Yes, as long as the feature is supported.

A ScrollViewer enables content to be displayed in a smaller area than its actual size. When the content of the ScrollViewer is not entirely visible, the ScrollViewer displays scrollbars that the user can use to move the content areas that is visible. The area that includes all of the content of the ScrollViewer is the extent. The visible area of the content is the viewport.

The following contain a ScrollViewer in their templates:

ListView
GridView
TextBox
RichEditBox

In this post you will see a ScrollViewer inside a GridView. The ScrollViewer has two contents, an Image and a TextBox.

The TextBox has its own ScrollViewer with only horizontal scrolling. The default text which is 'Rose' changes to a longer sentence (Event: ViewChanged="SV_ViewChanged") which can be scrolled using your finger or, with the left/right arrow keys when the cursor is anchored in the text box.

The image and the text as a whole can be scrolled both vertically and horizontally.

Here is the project's design view. The default text is 'Rose':


Here is the XAML of the project.

The following is the image when deployed to Local. Notice that the event fired and text box content has changed and the text in the textbox can be scrolled.


This is when deployed to a 4" emulator.

!!I am still trying to figure out why there is a white strip at the top of the image in emulator.


Saturday, April 7, 2018

How do I handle this error during project creation (C++ Console Application) from a template?

Trying to create a C++ Windows Console Application brings up this error. I could create a project without an error two days ago. The only thing that has changed is that there was on OS build upgrade yesterday.

Microsoft Visual Studio Community 2017 Version 15.5.7 on Windows 10 Pro, Version 1803, build 17133.1 installed 4/6/2018

Error details:

Error: this template attempted to load component assembly 'Microsoft.VC.Wizards, Version=15.0.0.0, Culture =Neutral,
PublicKeyToken=b03f5f7f11d50a3a'. For more information on this problem and how to enable this template, please see documentation on Customizing Project Templates.


Well, right now I have no solution. Will post, if I find a solution. In the mean time , you can help by commenting.

Monday, April 2, 2018

I cannot find C++ Console application template in Visual Studio 2017 Community, Why?

There is no need to panic. Visual Studio 2017 Community has a fine-grained installer. It is possible that you missed choosing the required programs. Your New Project looks like this now.


There are no templates in the above window. There is a link, Open Visual Studio UI shown in the above window. Click the link and after a little while, the installer is launched as shown. However, you may encounter this window. Click Update and you may get yet another window asking you to save/close running programs.

Now the installer is launched.


It appears I did not choose to install Desktop development with C++. Place check mark and allow the program to add this and any other that you choose to your VS 2017 Community.

After the changes the VS 2017 is relaunched and now you find many more C++ related templates in your New Project windows as shown.


The modification also adds these programs to your Visual Studio 2017 Community:

Microsoft Visual C++ 2017
Microsoft Visual C++ Wizards -1.0

Sunday, January 7, 2018

How do you change the BACKGROUND color of a XAML button using a CLICK event in C#?

Sometimes you need to change the background color from its default to a different color. Let us say, we have a button whose Background color needs changing by an event such as the CLICK event.

How is it done?
Well, I could give you a line of code to do that. Perhaps it will work and all that there is to it. However, if you are beginner and wondering how the hell it is coded with so much of background code, namespaces; classes, methods, events etc.

This post tries to show how you may find yourselves how to do it.

If you are looking for the one line of code, please go to the end and you will find it there. If you are beginning to code and new to Microsoft; new to Visual Studio in particular, follow on.

As mentioned in my previous post Universal Windows Project use XAML for the UI and the pages.
Some of the things you should remember is that you should use intellisense as much as possible. You should also use code hints you get when your code is not doing what you except.

In order to illustrate let us start with the code for a BUTTON click event for a button named ClickMe as shown:
=========
public sealed partial class MainPage : Page
    {
        public MainPage()
        {
            this.InitializeComponent();
        }

    
        private void ClickMe_Click(object sender, RoutedEventArgs e)
        {
            ClickMe.FontSize = 50;
           
        }
    }
}

===============

The above code changes the font-size to 50 when the button is clicked. We add one more line which changes the BACKGROUND color to red.

Start with ClickMe (the object) by typing below ClickMe in the above code.

As soon as you typein Click you will see this:


ClickMeEvent_0

Pick ClickMe from the above and add a period to it after that and you will get more pop-up as shown.


ClickMeEvent_1

Pick Background and your code looks like this:


ClickMeEvent_3

You try the 'dot trick' again by typing a dot after Background as shown. You do get a pop-up which does not seem to have anything to do with color.


ClickMeEvent_4

Now you need to know that color is given by using a brush and you have an Object called SolidColorBrush besides other kinds. In XAML scenarios, Color is not referenced directly but by the component SolidColorBrush.


ClickMeEvent_5

Now you type in SolidColorBrush but you get the red wiggly (oops, something not right).


ClickMeEvent_6

You place your cursor on SolidColorBrush and you get a hint. SolidColorBrush is a class name and you are looking for a color value. Instead of using the class, you should use an instant of the class with the 'new' keyword as shown.


ClickMeEvent_7

The red wiggly is still there but you have made progress.

Well this gives a hint that you must follow up this with one of [], {},or ().

Let us type the parenthesis-begin as shown


ClickMeEvent_8

There are two options as shown.


ClickMeEvent_9

The first method gives no color and the second options uses one of the Windows colors.


ClickMeEvent_10.jpg

Now I use the hint from the image one previous to the above. And we continue with code as shown.


ClickMeEvent_11.jpg

Well, again we are getting the class COLOR. Place the cursor on the color and find out what is needed.

Now with the dot trick we are ahead to choose a color we want.


ClickMeEvent_12.jpg

Now we have to choose the color from inserting proper values for the arguments of the function
FromArgb() as described in this post here.

Let us choose a ALPHA (transparency)channel value of 255 and a RED channel value of 255, BLUE channel value 0 and Green channel vlaue of 0 as shown. Type these into FromArgb() as shown.


ClickMeEvent_14.jpg

Now we are rid of the pesky red wiggly line. Ready to rock and roll.

Build the code from the main menu and deploy it to the local machine as described in my earlier post.

The Build succeeds as shown.


ClickMeEvent_15.jpg

Now Deploy the solution and you get this result as there are no errors:
========
Deploy started: Project: HelloWorld, Configuration: Debug x86 ------
Updating the layout...
Copying files: Total <1 br="" layout...="" mb="" to="">1>Checking whether required frameworks are installed...
Registering the application to run from layout...
Deployment complete (0:00:18.287). Full package name: "b940c521-2fb5-429c-9486-69bb2a425e90_1.0.0.0_x86__ckpvgz13cfhxc"

========== Build: 0 succeeded, 0 failed, 1 up-to-date, 0 skipped ==========
========== Deploy: 1 succeeded, 0 failed, 0 skipped ==========
Now run the project and you get this display of  your application
<1 br="" layout...="" mb="" to="">

<1 br="" layout...="" mb="" to="">
<1 br="" layout...="" mb="" to="">ClickMeEvent_16

Now click the Hello button to see the Background color and font size change as shown.


ClickMeEvent_17

After verifying close the application and you get the following response:
==================
The program '[15840] HelloWorld.exe' has exited with code 1 (0x1).

That's it folks!