Thursday, August 16, 2012

How to create a drive partition on Windows 7 Home Premium?


Want to try some programs on a partitioned drive? Dual boot Windows 7, Windows 8, Linux etc.

If you need measured steps to do it with screen shots, here it is:

Here I am trying to release some space from my C:\drive


To get to see this you need to go Start | Computer and make a right click and choose Manage from the drop-down list. In the Computer Management Screen choose Disk Management.


Right click the highlighted drive (C:) and pick up shrink Volume..
You get to the Shrink C: screen 


Enter the amount you want to shrink. This was my choice.


Hit Shrink button.

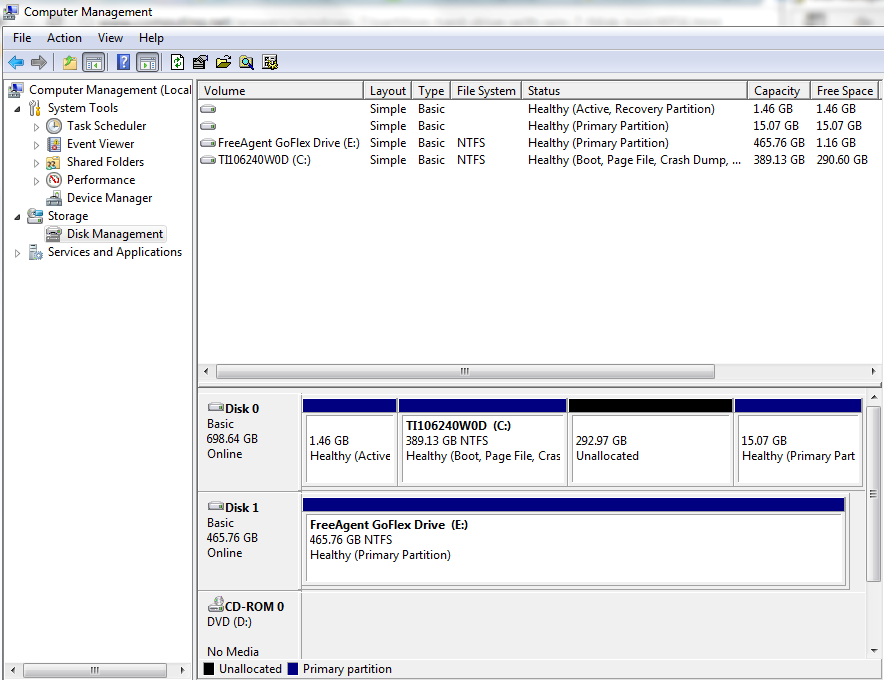
Now you are sizzling. You have 292.97 GB free.
Right click this new released space and click New Simple Volume...

New Simple Volume Wizard shows up.


Read the stuff on it. Hit Next. You need to specify the size of this volume (how many gigabits).


I chose about 40 GB (twice the minimum requirement).

Hit Next. Now in this screen you can choose to create the partitioned drive.


I assumed F: drive. Hit Next to get to the Format drive screen.


I gave Windows 8 as Volume label. Hit Next.


Now you have a F:\ drive with about 40GB. Disk Manager screen gets updated as shown.


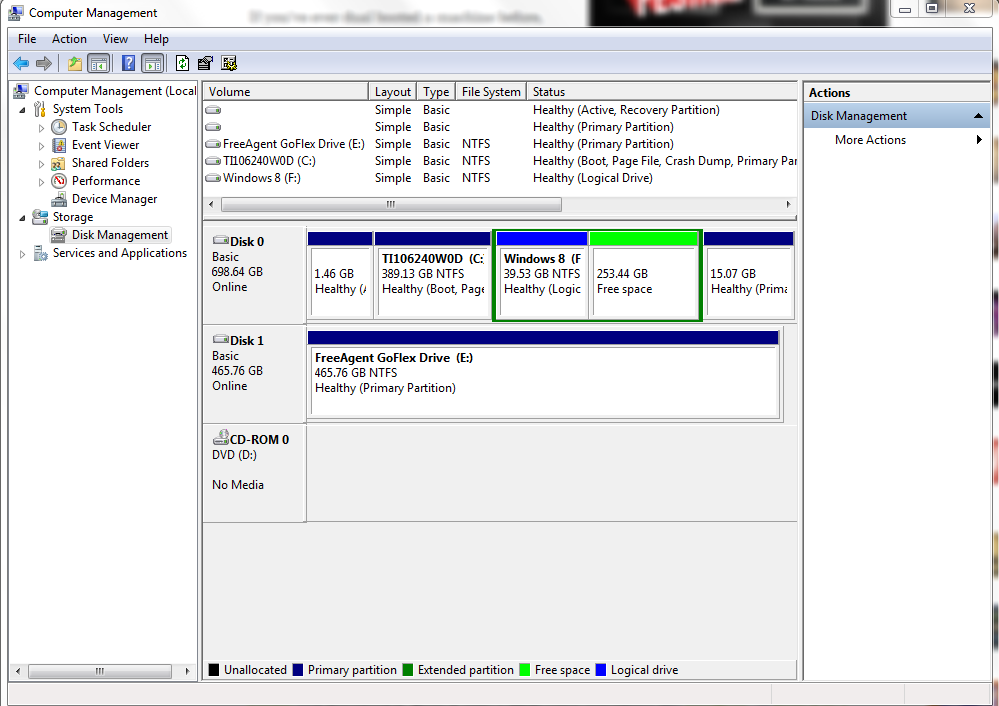
You are cooking now. The drive appears in the Windows Explorer as shown.


Tuesday, August 7, 2012

How do you import a text file to MS EXCEL 2010?

Text file should have some delimiting characters such as comma, tab, etc. Here we assume comma as the delimiting character.

Step 1:
Download the file to a location of your choice, say C:\

Or

Click to VIEW the attachment. Select all in the view. Open Notepad and paste the selected items to Notepad.

Save the Notepad with the selection pasted to a location of your choice, say C:\. Use the file name PrincetonTemp. It will be saved with the extension .txt.
If you cannot complete Step 1 go to the end of this post.


Step 2:
Open a new EXCEL workbook.

Step 3:
Click the menu item DATA at the top.


Step 4:

Now Click the item From Text.

This opens the Import Text File window. Now you go to the location where you saved the file.

In my case it is on the Desktop in a folderr called Basic Excel Training as shown above.

Step 5:

Click PrincetonTemp in the window above and click the button Import at the bottom.

Step 1 of 3 of the Text Import Wizard is displayed as shown.


Note 1: You can see the location of your file here
Note 2: You can see part of your data.

Step 6:
Click the Next button at the bottom.


The Step 2 of 3 of the Text Import Wizard is displayed as shown above.

Since your file has (,) comma delimited. Place a check mark in the check box named  ‘Comma’ as shown below.


Notice that when you click in the box ‘Comma’, you will see the preview of your data as shown above. You are almost there!

Step 7:
Click the button ‘Next’.

Step 3 of 3 of Text Import Wizard is displayed. Here you can make changes to the data and format it. For now Just click Finish at the bottom of the screen.


The Import Data screen is displayed as shown:


If you now click OK, the Excel program will paste the imported data beginning in cell A1.
 You can post it to another location or to a new worksheet. For this exmaple let us just click OK.

The data is imported to the worksheet as shown here.


That completes the Import Process.
---------------------------------------------------
If you could not download the file from my email to you, here it is, just copy and paste it to Notepad
January, 40, 60
February, 32, 50
March, 43, 65
April, 50, 70
May, 53, 74
June, 60, 78
July, 68, 70
August, 71, 70
September, 60, 82
October, 55, 67
November, 45, 55
December, 40, 62

How to get a Windows Live account?

Even if you have Google, Yahoo and other accounts, you should try Windows Live account. It opens the door for many things including all your social networking stuff. You also get to store your stuff on 'skydrive', which is password protected and you can access it from anywhere assumign you can get to internet.

While choosing usernames try to choose a slightly longer name than your own first name or nickname. if you are john do not choose john, try john$$ for example. The same goes to password, choose one hwich has atleast 8 characters, not something like '1234'. '1234' is easy to remember but a lot easierr to hack.

Now for the step-by-step tutorial:
1.  Hold down Control key (CTRL) and click on the blue line below.


The following page is displayed:

2.  Now click on SIGN UP in blue (the above should be in the web page).

The following page is displayed.


3.  After you finish the ‘Who are you?’ section do the following:

4.  Click on ‘Or get a new email address”.

The following is displayed:


You have already entered your personal information.  In the Microsoft account name box type in the first part of your email address. This form will add @ Hotmail.com to it. If you already have a ‘hotmail’ account you can use it. You can get a ‘Live.com’ account as well.

The other option to Hotmail.com is the following:


Make sure the name is little more than a few letters. TOM or CLARA will not do because there may be many more with the above name. Perhaps TOM_JULY30 or CLARA$ may be more easily available. Try to type in a slightly complicated account name. WRITE IT DOWN IN YOUR NOTE BOOK.


5.  In the create a password box type in a password which contains atleast 8 letters and atleast a number. WRITE IT DOWN IN YOUR NOTE BOOK.

6.  Reenter the password you just entred.

7.  Enter your telephone number (the one you access daily)

8.  If you have another email address (perhaps, someone@yahoo.com  or someone@gmail.com

9.  Next you write the ZIP code in its box.

10. In the bottom most box type exactly what you see in blue under(New|Auto).

11. Click I accept

12. If there are no issues you will see the final page which says your entry was successful. It probably opens on  your Windows Live Account page.

Tuesday, July 31, 2012

How do you sign up for Windows Live account?

Even if you have Google, Yahoo and other accounts, you should try Windows Live account. It opens the door for many things including all your social networking stuff. You also get to store your stuff on 'skydrive', which is password protected and you can access it from anywhere assumign you can get to internet.

While choosing usernames try to choose a slightly longer name than your own first name or nickname. if you are john do not choose john, try john$$ for example. The same goes to password, choose one hwich has atleast 8 characters, not something like '1234'. '1234' is easy to remember but a lot easierr to hack.

Now for the step-by-step tutorial:


1.  Hold down Control key (CTRL) and click on the blue line below.


The following page is displayed:

2.  Now click on SIGN UP in blue (the above should be in the web page).

The following page is displayed.


3.  After you finish the ‘Who are you?’ section do the following:

4.  Click on ‘Or get a new email address”.

The following is displayed:


You have already entered your personal information.  In the Microsoft account name box type in the first part of your email address. This form will add @ Hotmail.com to it. If you already have a ‘hotmail’ account you can use it. You can get a ‘Live.com’ account as well.

The other option to Hotmail.com is the following:


Make sure the name is little more than a few letters. TOM or CLARA will not do because there may be many more with the above name. Perhaps TOM_JULY30 or CLARA$ may be more easily available. Try to type in a slightly complicated account name. WRITE IT DOWN IN YOUR NOTE BOOK.


5.  In the create a password box type in a password which contains atleast 8 letters and atleast a number. WRITE IT DOWN IN YOUR NOTE BOOK.

6.  Reenter the password you just entred.

7.  Enter your telephone number (the one you access daily)

8.  If you have another email address (perhaps, someone@yahoo.com  or someone@gmail.com

9.  Next you write the ZIP code in its box.

10. In the bottom most box type exactly what you see in blue under(New|Auto). It is not case sensitive.

11. Click I accept

12. If there are no issues you will see the final page which says your entry was successful. It probably opens on  your Windows Live Account page.

Wednesday, May 16, 2012

What is DTS?

SQL-DMF: SQL Distributed Management Framework is a set of utilities that are not part of the database engine (like Query Analyzer and Enterprise Manager). There are three application programming interfaces, or utilities that allow us to access all the objects in the SQL Server. They are:
 SQL Namespace - SQL-NS
SQL Distributed Management Objects - SQL-DMO
SQL Data Transformation Services - SQL-DTS
DTS, which stands for Data Transformation Services, enable transfer of data and objects between different SQL 2000 Server systems. DTS was originally created to transfer data from OLTP data into OLAP data, which included the various steps of extracting the data, cleansing and transforming to remove inconsistencies, and then loading the data (popularly known as ETL). DTS can validate and summarize data while transferring -- making it extremely powerful.

DTS is available to all SQL Server editions from Enterprise to MSDE. DTS uses OLEDB, so it can be used for transferring data from one OLEDB to another OLEDB and therefore is not specific to SQL Server. It could be used to transfer data between any OLEDB supported databases, for example between Oracle to MS Access without an SQL 2000 middle man. Since Microsoft OLEDB for ODBC can connect to ODBC sources, the data transfer functionality is extended to ODBC sources, and DTS assumes an even more powerful role.

This article will be very useful if you are still using SQL Server 2000

SSIS replaced DTS in the recent SQL Servers after its 2000 Version. If you want a jump start on SSIS, I recommend my books which describes some 20 ETL Tasks. This book may be purchased from Amazon.com

Thursday, May 3, 2012

How do you create an empty database in SQL Server Express 2008 R2?


Step 1: Connect to SQL Server Express 2008 R2 in the SQL Server Management as shown.
Right click the Databases node and from the drop-down list shown  click New database.


Step 2: In the New Database window that pops-up provide a name for the database you want to create, herein Htek. If you want you can choose a size different from default size of 2 MB.


Click OK.
This is all that is necessary for creating an empty database on the server. You may click the navigation on the left side for working with file groups and many other options.

After clicking OK you will see the Htek database added to your Databases node which earlier had only System databases. Note however you may need to refresh by right clicking the Databases node and choosing Refresh at the bottom of the list.

Wednesday, June 29, 2011

How to create a certificate that can be used in the deployment of a LightSwitch program manually?

You need to use a program called MakeCert.exe to create a certificate that you can use while deploying a Microsoft LightSwitch Application.

You can access the file on your computer if you have Microsoft SDK. You can get the help files using command prompt as shown here,

C:\Program Files\Microsoft SDKs\Windows\v6.0A\bin>makecert /?

This provides you with the description of necessary arguments to create a certificate.

For example for creating a certificate that can be used in the LightSwitch program which requires a code signing certificate the following command line arguments were used:

C:\Program Files\Microsoft SDKs\Windows\v6.0A\bin>MakeCert -sky signature -r -n "CN=hodentek" -pe -a sha1 -len 2048 -ss My -s
r LocalMachine "LS2Tier.cer"

However, after running this program you may have to look on your local machine's certificate store where you will find the certificate. This needs to be exported so that it can be used in a LightSwitch Program when you publish(deploy) the application.