Let us assume you want to read the voltage from a potentiometer which is connected to the Arduino UNO. Let us further assume that it is analog voltage that you need to read.
If you are new to Arduino and Visual Studio read the following:
http://hodentek.blogspot.com/search?q=Arduino
Arduino has a 'sketch' for this specific case shown next:
------------
/*
AnalogReadSerial
Reads an analog input on pin 0, prints the result to the serial monitor.
Attach the center pin of a potentiometer to pin A0, and the outside pins to +5V and ground.
This example code is in the public domain.
*/
// the setup routine runs once when you press reset:
void setup() {
// initialize serial communication at 9600 bits per second:
Serial.begin(4800);
}
// the loop routine runs over and over again forever:
void loop() {
// read the input on analog pin 0:
int sensorValue = analogRead(A0);
// print out the value you read:
Serial.println(sensorValue);
delay(1000); // delay in between reads for stability
}
--------
You should first set up the circuit required for this sketch which requires the two ends of potentiometer tied to 0 and 5V of the Arduino and the center leg (has the variable voltage) depending on the potentiometer setting tied to the terminal A0 on the Arduino Uno board.
The Arduino must be connected to the USB port of your laptop/desktop which has Visual Studio appropriate for working with arduino Uno.(ref).
Once this is set up, run the sketch on Visual Studio and verify that you can monitor the potentiometer reading converted to digits (this is done by the sketch).
Now create a new Visual Basic Windows Form project and place controls on the form as shown here. It is essential that you add a SerialPort control as well from the Toolbox.
Here is the project folder:

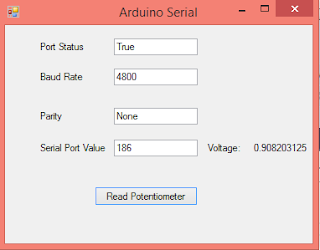
Here is the Form1 of this project:

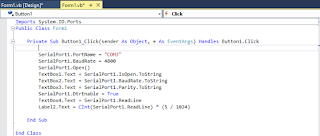
Here is the code for the button click event:
Here is the reading of the potentiometer:
If you see this message just ignore it:
The thread 0x2f14 has exited with code 259 (0x103).
The thread 0x1d2c has exited with code 259 (0x103).
The thread 0x30ec has exited with code 259 (0x103).
The thread 0x3ab4 has exited with code 259 (0x103).
If you are new to Arduino and Visual Studio read the following:
http://hodentek.blogspot.com/search?q=Arduino
Arduino has a 'sketch' for this specific case shown next:
------------
/*
AnalogReadSerial
Reads an analog input on pin 0, prints the result to the serial monitor.
Attach the center pin of a potentiometer to pin A0, and the outside pins to +5V and ground.
This example code is in the public domain.
*/
// the setup routine runs once when you press reset:
void setup() {
// initialize serial communication at 9600 bits per second:
Serial.begin(4800);
}
// the loop routine runs over and over again forever:
void loop() {
// read the input on analog pin 0:
int sensorValue = analogRead(A0);
// print out the value you read:
Serial.println(sensorValue);
delay(1000); // delay in between reads for stability
}
--------
You should first set up the circuit required for this sketch which requires the two ends of potentiometer tied to 0 and 5V of the Arduino and the center leg (has the variable voltage) depending on the potentiometer setting tied to the terminal A0 on the Arduino Uno board.
The Arduino must be connected to the USB port of your laptop/desktop which has Visual Studio appropriate for working with arduino Uno.(ref).
Once this is set up, run the sketch on Visual Studio and verify that you can monitor the potentiometer reading converted to digits (this is done by the sketch).
Now create a new Visual Basic Windows Form project and place controls on the form as shown here. It is essential that you add a SerialPort control as well from the Toolbox.
Here is the project folder:
Here is the Form1 of this project:

Here is the code for the button click event:
Here is the reading of the potentiometer:

If you see this message just ignore it:
The thread 0x2f14 has exited with code 259 (0x103).
The thread 0x1d2c has exited with code 259 (0x103).
The thread 0x30ec has exited with code 259 (0x103).
The thread 0x3ab4 has exited with code 259 (0x103).
1 comment:
Thanks so much for this code!
I had to change two thing to get this to work for me. I have posted the revised code below. The highlighted changes are bold.
1) I could not see how you created the labels for the TextBoxes. So, I used "Label" for those. But doing so, bumped up "Label2" to "Label6".
2)I was getting an exception saying that I could not declare the COM port after SerialPort1 was already open. So I started the sub routine with the SerialPort1 closed.
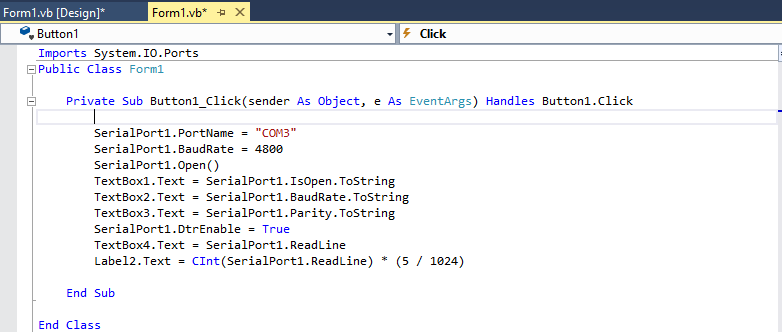
Here is the revised code:
Imports System.IO.Ports
Public Class Form1
Private Sub Button1_Click(sender As Object, e As EventArgs) Handles Button1.Click
SerialPort1.Close()
SerialPort1.PortName = "COM8"
SerialPort1.BaudRate = 4800
SerialPort1.Open()
TextBox1.Text = SerialPort1.IsOpen.ToString
TextBox2.Text = SerialPort1.BaudRate.ToString
TextBox3.Text = SerialPort1.Parity.ToString
SerialPort1.DtrEnable = True
TextBox4.Text = SerialPort1.ReadLine
Label6.Text = CInt(SerialPort1.ReadLine) * (5 / 1024)
End Sub
End Class
-Roger
Post a Comment